
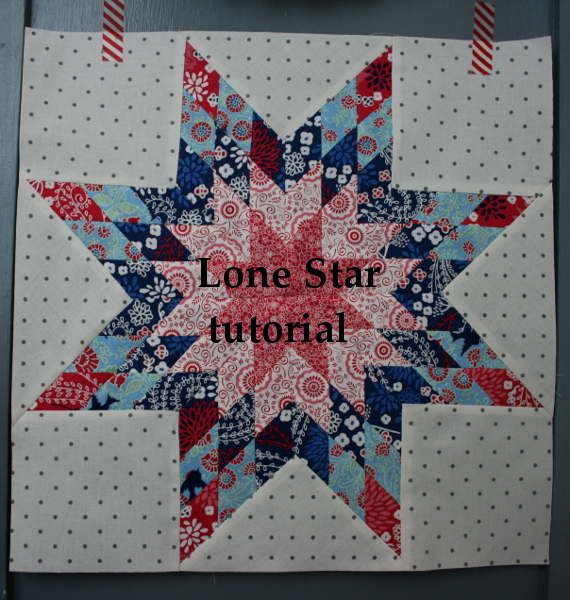
Lone Star Block tutorial
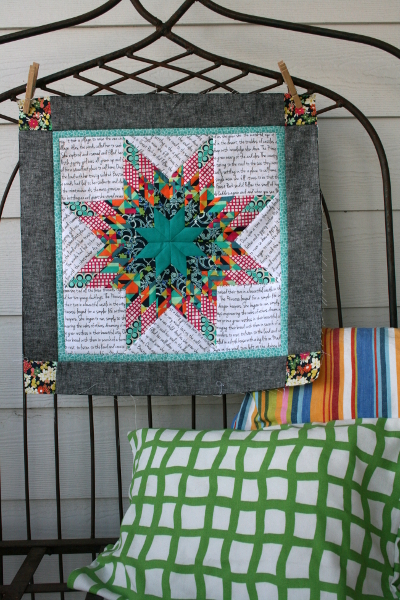
I mentioned here that I made a center block for three different medallion quilts. Two are Marcelle Medallion blocks from the medallion pattern in the Liberty Love book. The third was for the design as you go Medallion project we’re currently working on with the Utah County Modern Quilt Group. For that block I decided to make a lone star block.
I had some requests for a tutorial, and this is it – my method for strip piecing to make a lone star quilt block. I’ll be excited to see how it’s used!
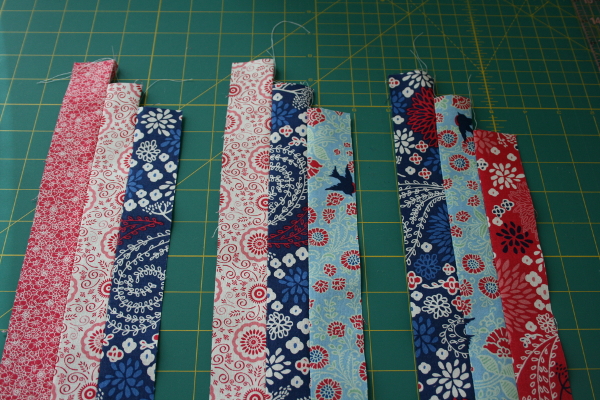
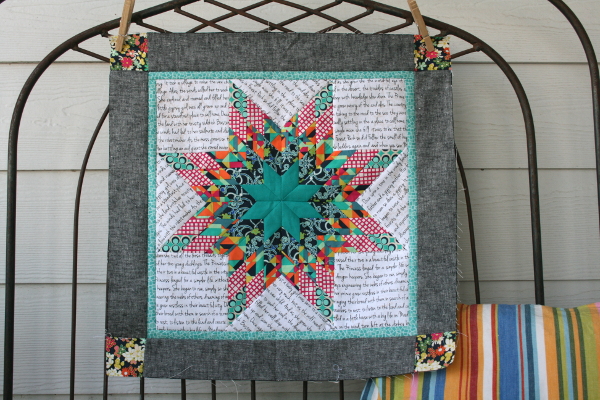
To begin, choose five fabrics for your star colors. The fabrics I’m using in my original medallion block are from the Carnaby Street collection by Pat Bravo for Art Gallery Fabrics. The prints I’m using here are from the Vintage Summer collection by The Yellow Bicycle for Blend. You want prints that look good together but also have enough contrast to show off the beauty of the lone star block.
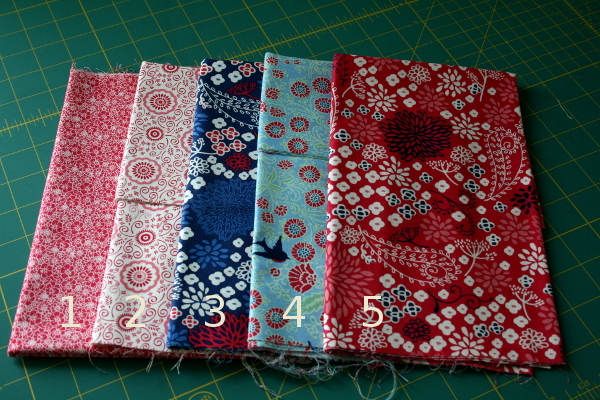
Keep in mind that the fabric you choose for #3 will be the most prominent fabric, with #1 in the very center and #5 on the outer tips of the star.

Cut 1 – 1.5 inch wide x width of fabric strip from fabrics 1, 2, 4 and 5. Cut two strips of fabric #3. You should have a total of 6 strips of fabric that are 1.5 inches wide and 42 inches long. Next cut each strip in half lengthwise by simply cutting at the fold of the fabric, giving you 12 strips of fabric that are 1.5 inches wide and 21 inches long.
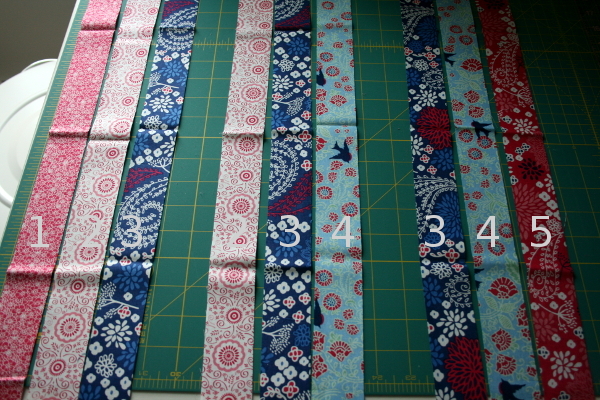
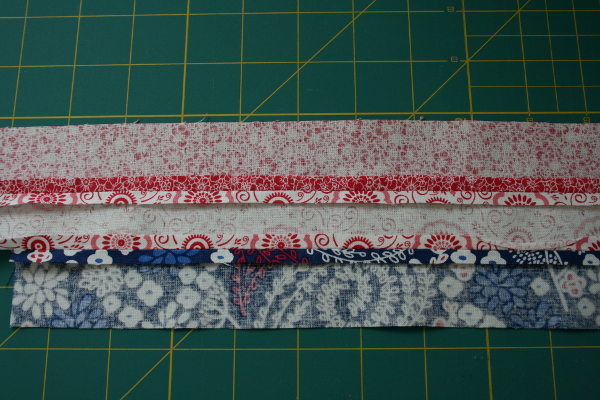
Now we need to create three sets of strips. The first should be fabrics 1, 2 and 3 in a row, then fabrics 2, 3 and 4 in a row, and the last set from fabrics 3, 4 and 5. You will have three strips left, one each of fabrics 1, 3 and 5. They will not be used in this block.
At this point I carefully starch my fabrics. I like to use Best Press, available at local quilt shops. To starch, I spray the back of the fabric, turn it over, then carefully press. Because these strips can so easily be stretched, be sure to simply lift the iron and set it down instead of moving it back and forth to distort the fabrics. Starching your fabrics will go a long way toward helping your seams be consistent and your points matched up. The starch helps the fabric behave more like paper, with less stretching or slipping.
All seams in this block should be an exact 1/4 inch seam. Check your machine to be certain your needle position is where it should be and make sure you know where the 1/4 inch mark is.
Sew your three sets of strips together in order, but start each strip about 1 inch down from the previous fabric as shown above.
Carefully press your seams open.
*Press all seams open in this quilt block!

With the first strip set carefully lined up on your cutting mat, find the 45 degree line. There should be one on your cutting mat to reference. Cut off the edge to make an even 45 degree cut.
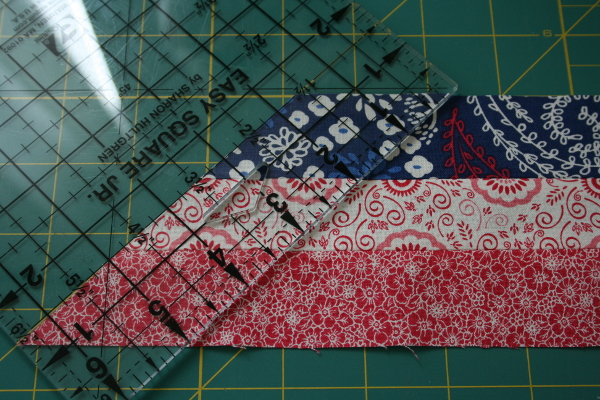
Measure 1.5 inches from the line you just cut. This is your next cutting line. Be exact!
Cut 8 of these strips.

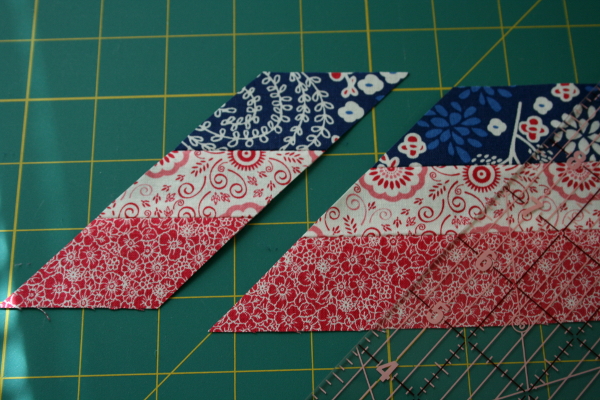
Repeat with the other two fabric strips, making three piles of 8 – 1.5 inch wide strips.
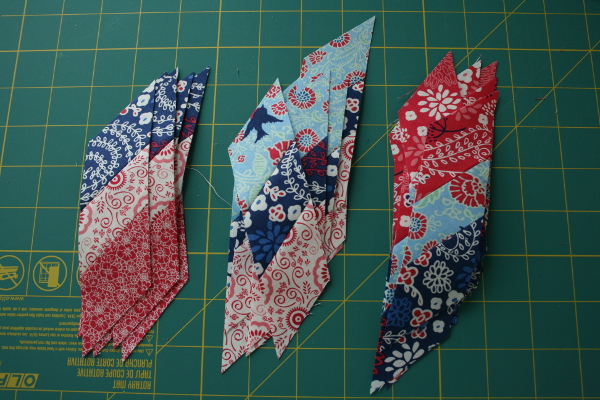
Now to start piecing! We will make 8 small diamonds. We’ll call our first strip (fabrics 1, 2 and 3) strip A, our second set (fabrics 2, 3 and 4) strip B, and our third set (fabrics 3, 4 and 5) strip C. Each diamond will be made with one each of strips A, B and C.
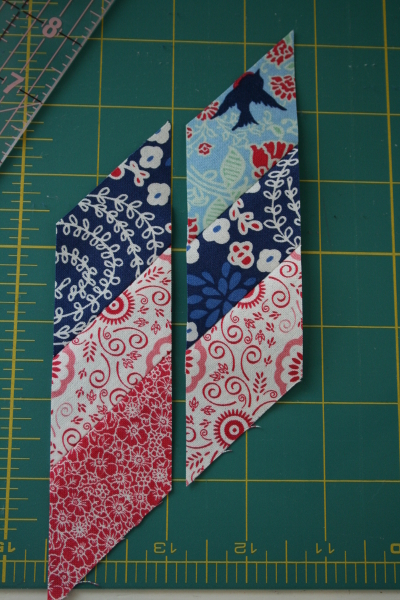
Begin with one strip A and one strip B. Lay them out like so, then flip strip B over on top of strip A with right sides together. I think that the trickiest part of the lone star block is making sure the seams line up in these steps.
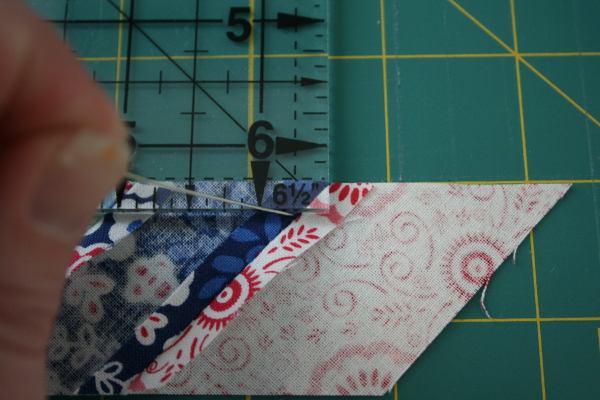
You may find it helpful to measure 1/4 inch on the back of strip B at the seams to understand where the strips need to line up so your points will be perfect. I do this with a pin, sticking it through both fabrics and checking to make sure that the pin goes right through the seams of both strips. I think it’s more important to check this at the intersection of your seams than it is at the ends of the strips. If you take time to pin carefully you will be rewarded with perfect points.
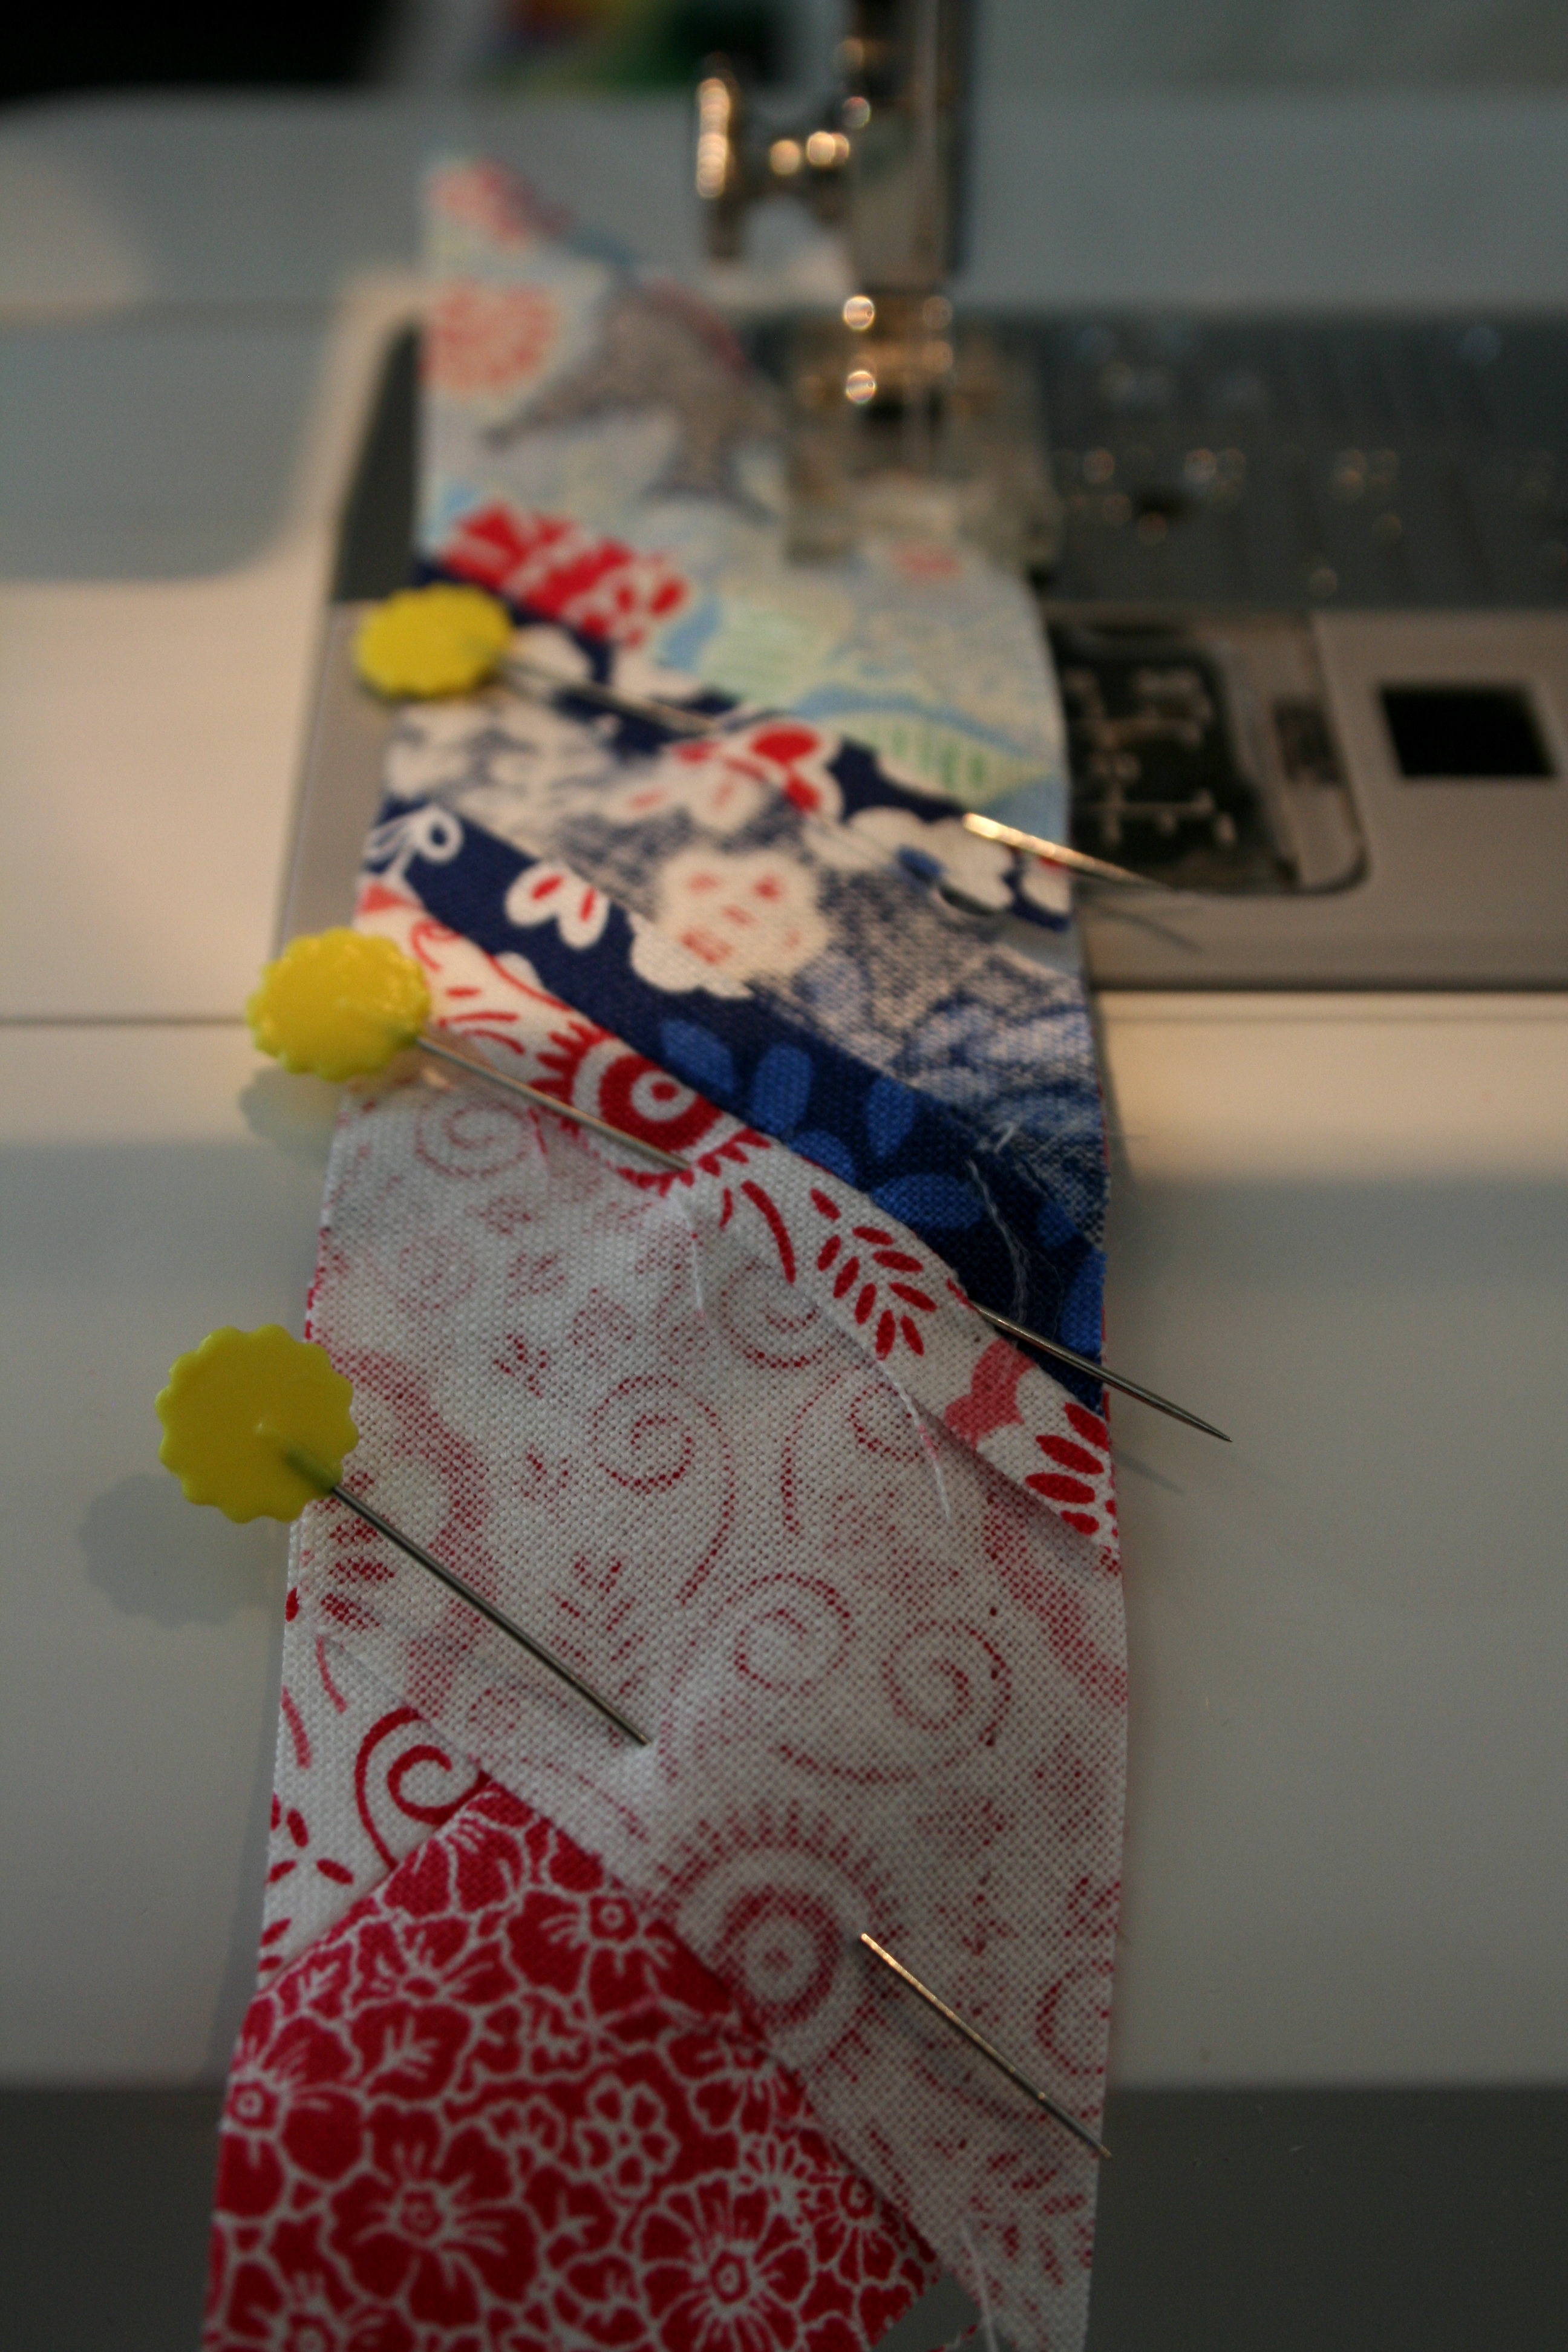
If this first seam doesn’t line up as well as you want it to, simply unpick it and re-pin it until you get it right. Once you’ve figured it out, the others will come much more quickly and easily. My theory is that you’ll be sewing a lot of them, so you might as well learn to do it right!

Now repeat with strip C, pinning it carefully (right sides together) to the edge of strip B. Again, pin and sew carefully, keeping your seam allowance even. I always set my machine to the slowest setting when I’m piecing these diamonds.
Your first diamond is complete. Iron it carefully, pressing seams open. I starch again at this point.
Repeat this process 7 more times until you have eight diamonds. Time to put the star together!
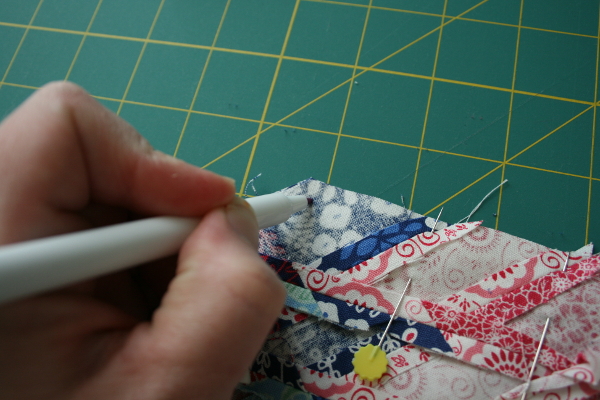
Note: it is important at this point to mark the back of your diamonds so you don’t forget to leave a 1/4 inch seam allowance for the “Y” seams that will add your background. I use a water soluble marker to measure and mark the dots on the side point of each diamond.
Pin the two diamonds together with pins at every seam intersection. I always start at the dot I marked, backstitching to set that thread, then sewing down the diamond to the center point. I always sew from this outer point toward the center for two reasons. First, it helps me remember that dot, and second, it prevents the diamonds from “spreading” so the star fits together nicely.
Press open the two diamonds, and you begin to see the star taking shape. So pretty!
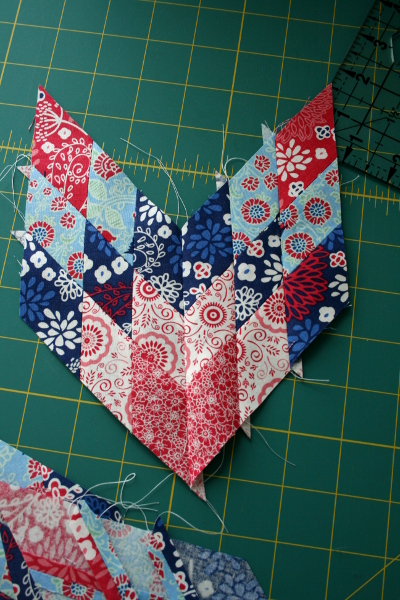
Continue until you have four diamonds sewn together to make half of the star.
Repeat the process with the other 4 diamonds, making two half stars.
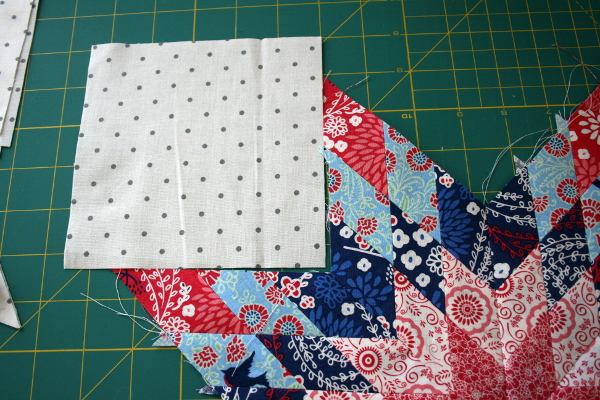
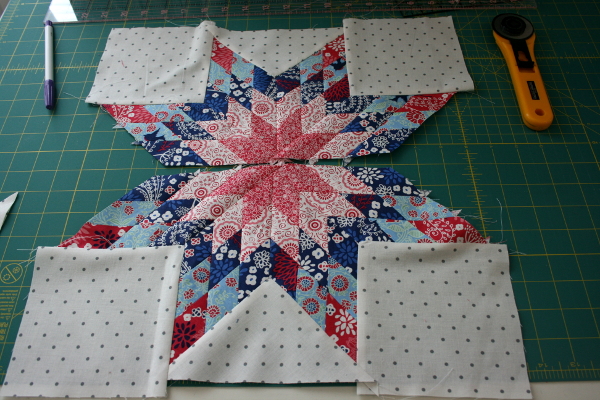
Now we’ll get our background fabric ready.
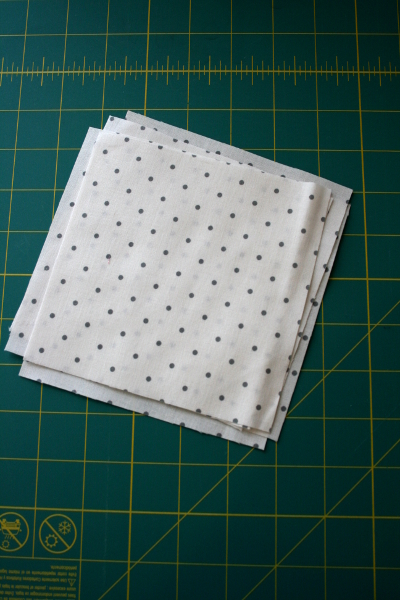
Cut six – 5.5 inch square pieces of your background fabric. For my original block I used the text print from the Madrona Road collection. For this block I’m using the gray dot print from the Cruizin collection by Barbara Jones.
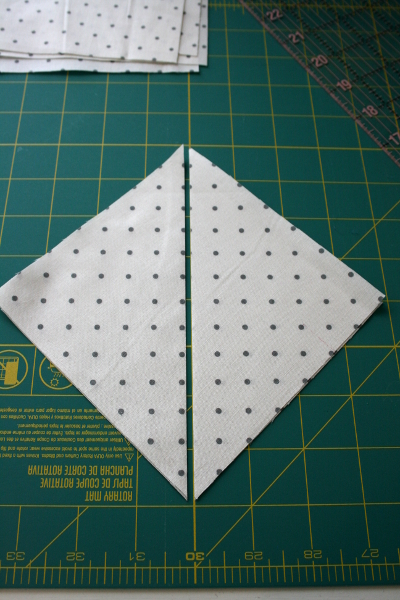
Cut two of those squares in half diagonally. You now have 4 squares and 4 triangles.
Time to start your “Y” seams.
Here is another tutorial if you’d like to read one, or you can also watch tutorials on YouTube. Set a square in the top left corner of your star so you understand where it goes. Then flip it right side down along the bottom line with the bottom edge still lined up with your star.

Once again, mark your 1/4 inch point on the back of the square in the corner. This mark should line up with the seam on your star that is open 1/4 inch because you marked the diamonds as well. Pin at this point, and along the seam.
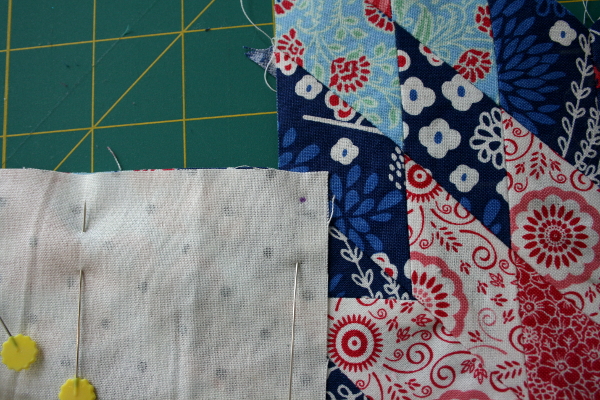
Beginning at the outer edge of the block, sew the background square to the side of the star until you get to your mark. At this point, keep your needle down, right on that dot.
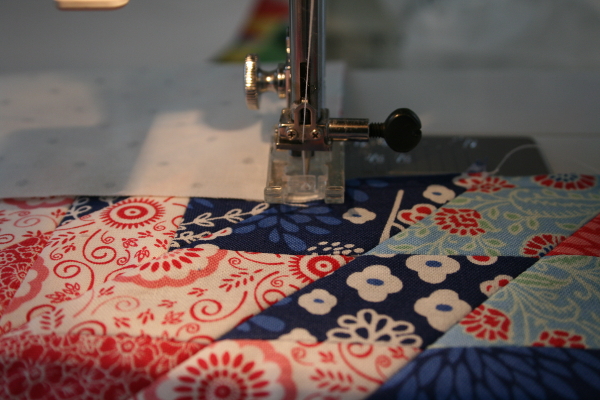
Lift your presser foot, keeping the needle down, and gently pull the edge of the background square toward the front of the sewing machine while also rotating the star towards it. Rotate your fabrics until both line up on a straight line and you can finish the seam.
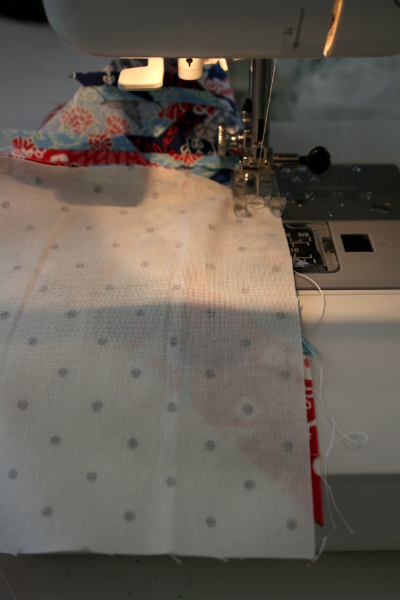
And the Y seam is done! Press the fabric and get ready for the next one.

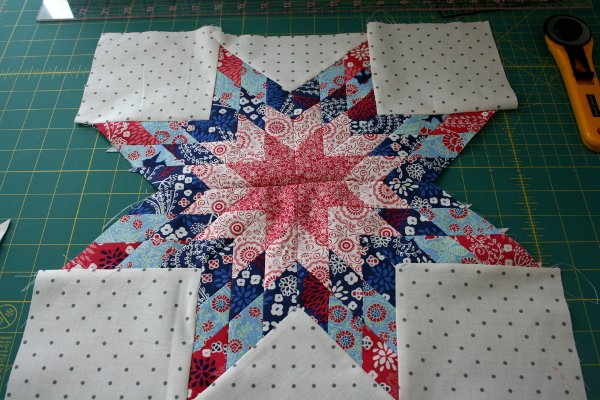
Repeat the process in the center with a triangle, again marking your pivot point, and sewing carefully.
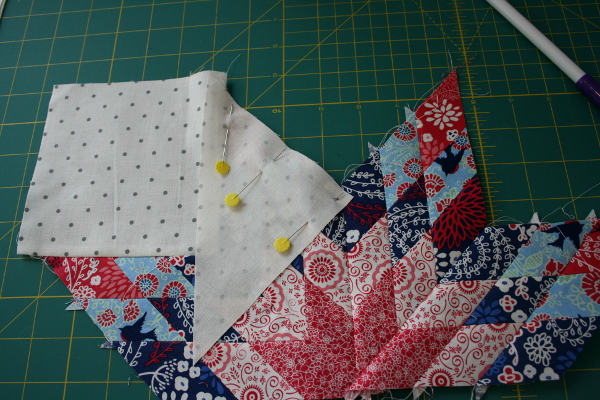
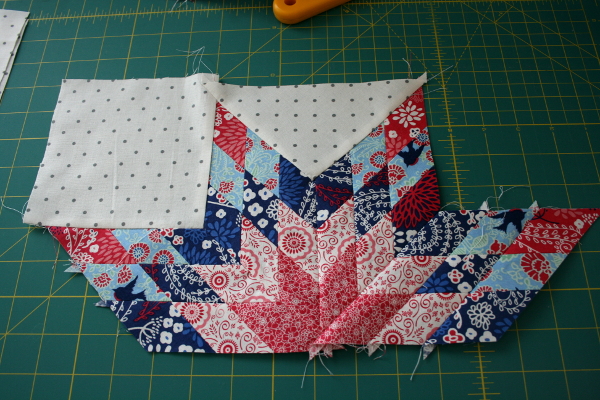
Now on to the right corner with another square until you have three pieces of background set in.
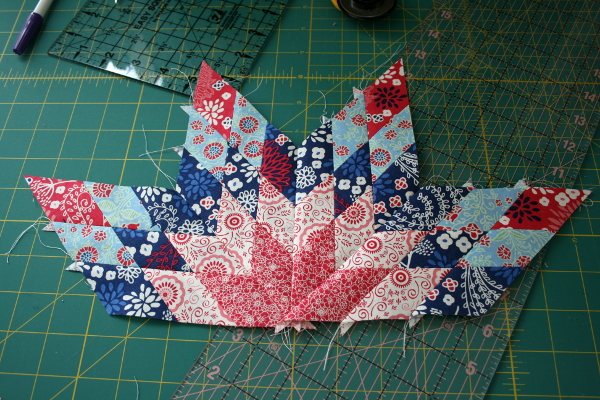
Repeat the process with the other half of your star.
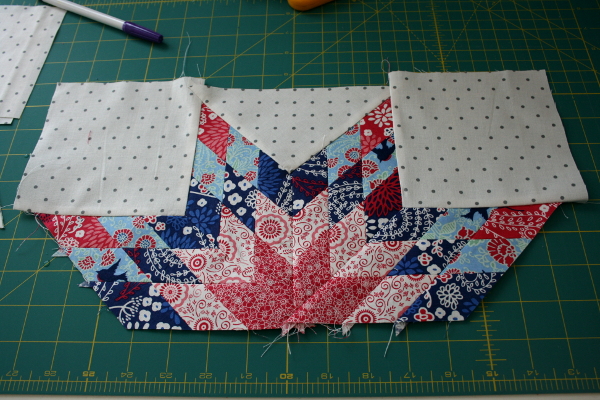
Now it’s time to sew the star together.
Once again, pin carefully at every seam intersection (especially the center one) and don’t forget your two marks on either end where you will backstitch. I had to darken mine a little so I wouldn’t forget them. Sew carefully.
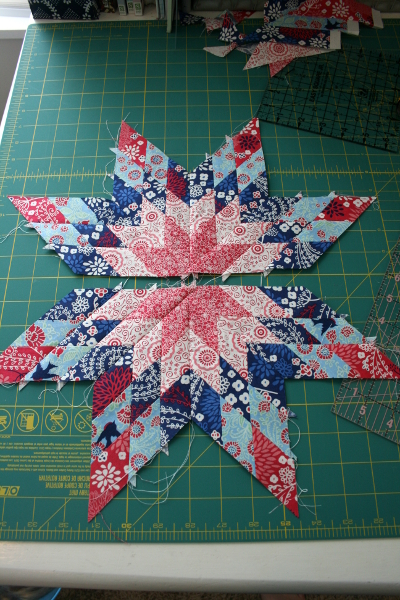
Press seams open and you’re ready to add the last two triangles to either side.
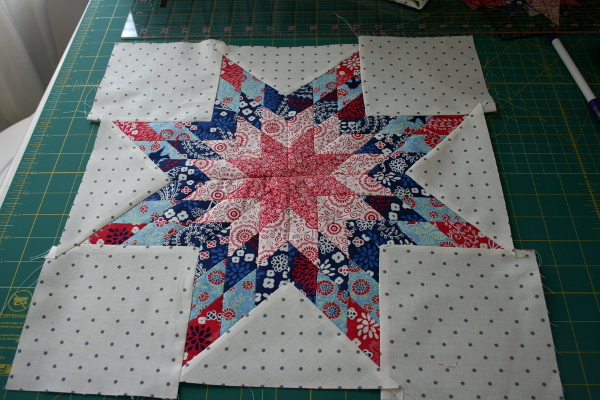
And it’s done! You just pieced lots of diamonds and 8 Y seams. Well done! Trim your block, being careful to make sure the corners are square, to 15 inches. Before you start trimming, make sure you’re leaving a 1/4 inch seam allowance at each star point so you don’t lose the points when you add borders.
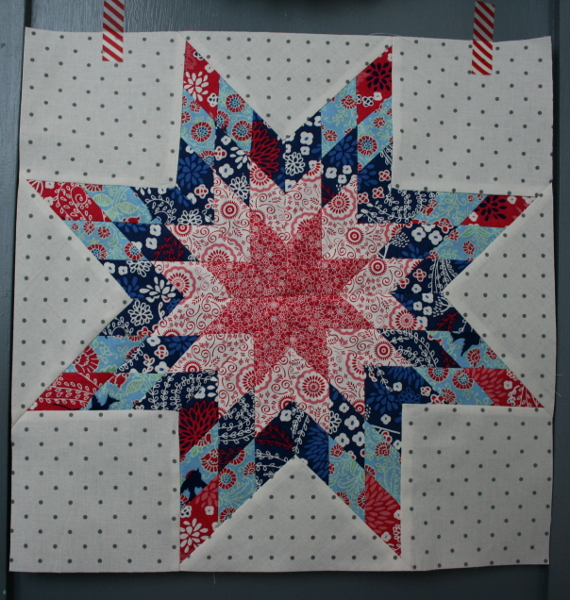
And there we have it. A lone star medallion center block.
*Edited to add:
Want to make a large, single-block lone star quilt? Try my Mod Lone Star Quilt Pattern . It uses the same principles in this tutorial, with wider and more strips, to create a stunning star.
See the quilt here.
I’ve created a simplified version of this tutorial in PDF form if you want a simple list of basic steps to follow without all the photos and instructions. This PDF includes a chart for cutting strips of various widths to create larger or smaller blocks.
Click here to download the Latest PDF FREE I have also created a page with links to all my lone star projects, which include a lone star quilt with 8 different sizes, a 64″ lone star block, and other variations of the lone star. Hopefully these posts will inspire you to begin a lone star project in whatever size interests you! Click here to visit my Lone Star page.
Great tutorial thank you – your Carnaby Street star is gorgeous
I love your Carnaby Street star.
Thank you for this tutorial! It is perfect timing for a project I am doing 🙂
Thank you so much for this tutorial, I recently bought a pattern online only to find it uses a template to make the lone star! I have been searching everywhere for a tutorial that makes sense of it using the strip piecing method, and now thanks to you I can get on with making the quilt I had in mind.
Pingback: A Low Volume Modern She Made Swap –
Your tutorial is fabulous – coming over from Cluck Cluck Sew.
Thank you for the wonderful tutorial. Your pictures are wonderful & your directions are quite clear. I am bookmarking this for the future.
Great tutorial – seems easy to follow. I’ll be pinning this to my quilting board!
your directions are so well written and appear easier to follow than the one I did about 25 yrs ago. The stars look gorgeous !
This is a great Tutorial! I’ve wanted to join the UCMQG but I know they do it in sessions. By chance do you know when the next session starts?
Jennifer, I believe the next session starts in August. You should join us!
Great tutorial, you stars look beautiful. Hope to have a chance to try one soon.
Pingback: Free Online Tutorials for Lone Star, a.k.a. Star of Bethlehem Quilts | About Quilts
thanks for the tutorial your quilts are gorgeous, loved viewing your sight
gracias por explicarlo tan bien tenia muchas ganas de aprenderlo ahora lo pondre en practica gracias de nuevo, hasta prontp
This is a great tutorial. I have always wanted to make a quilt like this. The ‘y’ seams freak me out a little. But with a smaller more manageable size…I think if I make a few of them I will be more at ease with the process and can try my hand at a larger size. I always appreciate those that take the time to do tutorials to help others along their quilting path. So thank you very much. I love the fabric choices that you used on your quilts. They really pop. Beautifully done.
I find the seam matching-pinning totally confusing. When the seams match at the fabric edges, they don’t line up across the diamond. No matter how I move them, either the points are off or the seams are off. This is a beautiful tutorial up to that point, but I can’t figure that step out (nor can my husband!) Please help.
Thanks.
Wow, your matches are so perfect. Thank you for the tute.
Hi. My sis just sent me the link to your site, more specifically to the Lone Star pattern, since I just told her I was interested in making one. I would like to “follow” you thru this quilt, but I don’t see a link to the next step (block). Has the entire quilt been finished and is it posted? I’m really “crazy” for all things stars…so this one is just right for me. Thanks.
Thanks for sharing.
Thanks so much for photos and tips. Ordered a book and felt more confused than helped! Appreciate your generous step by step, cut here, sew this…For all us bewildered newbies, Thanks very much!
Esto me gusta gracias por el tutorial……………
Great instruction, thank you!
Thanks so much for this great tutorial. Very clear , precise and helpful
Great tutorial, thanks!
Pingback: The incredible importance of the quarter inch seam allowance | The Printed Stitch
Wonderful block and what a thorough tutorial! After realizing I don’t have enough background fabric to work with for a project I stumbled on this block and it might be the solution!
I see your strips started out as 1.5″ I’d like to make this block using a jelly roll so I’ve got some quilt math ahead of me to try and adapt to a 1.25″ strip or a 2.5″ strip. If I work it out I’ll be sure to link to you and drop a note incase any of your other visitors are interested in that size adjustment! I love doing fun quilt math like that!
Hi Terri Ann! Thanks for your comment. The block will look fantastic with 2.5 inch strips. When you have the strips sewn together in sets of three and you are ready to cut on a 45 degree angle, make sure you cut widths of 2.5 inches and it will work great. You may need extra sets of strips depending on the width of your fabrics, and you will need larger background pieces as well. Good luck!
@Sandy
There’s a way to skip the y seam process just using smaller/half background triangles for the sides and attaching them to the diamonds first and then attaching the diamonds with the background already in place along one long continuous seam (does that make sense?). Hard to explain, but definitely possible.
It’s super stretchy though so pin and handle the triangles gently. It also gives you a seam up the middle of your background (may or may not bother you).
The lone star is one of my favorites. I have yet to try one. Your instructions are great and so clear. Thank you!
Gracias por compartir su saber con las demás, Un abrazo, Muy buena explicación, diría mas, EXCELENTE!!!
This will be my first quilt that I will be making. It will be for my daughter that will be born this August 13. I’m nervous about my corners lining up.
i don’t know if I will ever manage to do one this good but I won’t find a better tutorial. Thank you very much.
Love this quilt and the thorough and clear tutorial. I think it is just beautiful. Appre
ciate all the work and time you put in to make this tutorial. I will try to do this soon. Will send photo when done.
Emma Carpenter
Loooooooooove it!! Amazingly adorable. Great for a birfday gift. Thanks.
Pingback: Petal & Plume Lonestar Mini Quilt | Ants to Sugar – Quilter. Fabric Collector. Paper Piecer.
Muchas gracias, excelente
Pingback: Ants to Sugar – Quilter. Fabric Collector. Paper Piecer.
This is just beautiful. I’ve been waiting a long for a clear easy way of doing this, and this is it!! I’m going to start right away. I wonder how big this block is??
This is beautiful. Can’t wait to start this one!
Thank you for your tutorial. We have a challenge for our patchwork Groups’ Quilt In this year, to make a miniature quilt with a block with the same initial as our first name.
I chose Lone Star as my name begins with ‘L’. I had planned to hand piece it but will try your machine method instead. Cheers from Victoria, Australia
If I wanted to make a bigger quilt using this pattern could I simply increase the number of different fabrics I used as long as it was an odd number? And if I could do it that way would I still see up the pieces in the same manner – I.e. using 7 fabrics my #4 fabric would be my middle and I would have it in every strip set?
Thanks for the tutorial for this block. I have a quilt top that needs finishing. I have the star done. Should I just measure a leg of the star and make that size square? My star leg measures 22″ so I would cut 6 22″ squares and then cut two in half. Thanks for any help.
Thank you for the tutorial. I used to watch my Mother piece these quilt blocks and love them but never believed I could do it too. Now I can as a tribute to my Mother even though she has passed from this life. God bless
Thank you for a great Tutorial,this makes my sewing easier to understand,
I an starting this tomorrow. Thanks for the great tutorial. Susan
Just beautiful, clear precise instructions. I am itching to start a new project this is going to be the one.
Thank you so much for a very good tutorial. I found it easy to follow and now II understand the principal of the Lone Star (Star of Bethlehem?), I just must get on with it. dinner will just have to wait!
Pingback: On The Go Quilting » Friday Finds April 3
Thank you so much for producing this extremely detailed, pictorial and easy to understand tutorial on how to produce a lone star quilt; I shall be sharing it with my quilting friends.
This is such a great tutorial thank you so much!
Yes thank you ,very easy to fallow tutorial .
Thank you so much for this tutorial! I made my first lone star and this afternoon I’ll post some pictures on my website:)
Thanks for taking the time to give explicit instructions regarding how to mark and pin the crossing seams in the star. Now I understand this most important part.
So happy to find your tutorial. I’ve been working on 16 large 18.5″ lone star blocks and have completed 8. I was ready to call it quits on the remaining blocks. I sewed all the stars as complete, with the 8’pieced points joined in the center. Then I tried to add the squares and nothing worked.mthats the way the directions went; not clear, certainly not precise and it was awful. I started another quilt, one that I knew I could complete. Perhaps I can return to the 8 blocks now & work them out.
This is probably the BEST star tutorial I’ve ever seen – includes Y joints too…just great!! Thank you!
I have lot of interest in tailoring related all hobbies. But I don’t get chance to learn. You taught very easily to understand everyone. Thank you very much. Keep teaching.
I congratulate you on such clear instructions well done!!!and your photos are great too
Thank you so much for this amazing tutorial which makes this middle square so much easier than I ever thought it would be.
Great tutorial!easy to understand even to beginners like me! Very informative! Please email me if you do any more quilt tutorials.
Just want to say Thank You for the instruction. I’ve wanted to do a star but the instructions usually look too intimidating so I have put it off. With your help it was a great process… thanks again!
This is somewhat what I learned too. You show it in a very simple laid out method. I always had trouble with the inset “triangle” and was surprised to see you leaving one corner out. That makes some sense. Good tutorial.
Pingback: Rainbow Lone Star and Some Flowers | Aaseevana
Thank you for all the work you did to post this very useful tutorial. I’m a ‘visual’ learner and this tutorial is a blessing to me! You mention fabric lines I’ve not heard of before. May I ask what is your source for the fabrics you mentioned? (on-line, brick and mortar shops, or ??)
I wish to print this pattern out, with your permission. I could not find anything that would say i could print .thank you for sharing and showing how to make this beatiful star
What if you want to make a smaller square? How do I figure out the sizes of the strips and all?
Having a lot of trouble with this block. And no I am not blonde but use to be…lol
Please help.
I am in desperate need of advise. I’m starting on my 4th square and have made adjustments after each one. With the first square, the sides didn’t come out even. With the second square I readjusted my 1/4″ seam; felt it wasn’t right. With the third square I decided to trim the diamond (parallelogram) to 5″ per side and stay stitched the squares and half-squares. The final piece was far better, but still not right. I double checked my 1/4″ seam and determined that it was wrong and have re-set my marks on the sewing machine (I put a layer of three 1″ strips of duct tape at presser foot at my now perfect 1/4″ mark, to give me a bit of a dam to help guide the fabric through). I stitched the A-B-C panels with this new 1/4″ setting; but now the parallelogram’s sides each have a different measurement…4 3/4, 4 1/2, 4 1/2, 4 7/8 and point to point is 8 1/2 and 3 3/4. Do you have a measurement that each diamond must have? Any help and advice you have will definitely be appreciated!
Eu estou maravilhada!!!!!!Eu queria muito montar esta estrela e não conseguia, com esta explicação ficou fácil.. Muitíssimo obrigado!!
Very well done. Instructions are clear and precise. This is very helpful and thank you.
Thanks so muchforyour nifty tutorial. Very helpful and it worked just right!
I like your method. Seen a tutorial the other day on lightly glueing fabric together before sewing to ensure fabric staying in place and not having to use pins. I think between the two methods I will try another lone star and perhaps be successful this time!
I worked really accurately, or so I thought! I have ended up with lopsided diamonds that will not match in pairs, let alone make a star – what have I done wrong? Any ideas?
It is really a nice and useful piece of info. I’m happy that you shared this helpful information with us.
Please keep us up to date like this. Thank you for sharing.
Am I able to down load these patterns to my adobe pdf. Or can I print them for future use?
Great, informative tutorial! This past winter and spring I made a King size Lone Star quilt with 9 LoneStar blocks. I wish the directions in the McCall’s Quilting magazine was even half as concise as your blog. I’m sure you will save many quilters a lot of headaches. 🙂
Love this pattern !
Thank you for posting this tutorial. It’s a block I’ve always wanted to try, and now I will.
This was a great tutorial. So precise. Now I understand the Y joints! Thank you for the time you spent on this. Thank you, thank you, thank you.
I’d like to make a quilt with just this star in the center but bigger (full size). Is it possible to size this pattern up?
Thank you so much, I will definitely have a go with your tutorial. Thanks for sharing with me I live Downunder (Australia).
)
What sizes would i have to cut to make 1 big star in the center of a king size quilt?
Pingback: UFO Finish #4 | Monkey Needle
Excellent tutorial ???
Thanks for providing such a complété tutorial. My first lone star turned out gréât thanks to your instructions. Thanks again!
Thank u for sharing your knowledge, but I have a question if I am going to make full size how wide should I cut the stripes.. I was thinking 2.5 inches and should wash the fabric before I cut…
thank…
Great tutorial!! You make it look so easy for a beginner (like myself) I really want to try this!
Darlene, I probably would do at least 6 rows of fabric for a larger quilt.
This is a really great tutorial!!! I was able to enlarge the star by doubling the measurements and it came out great! Thank you for posting – this was extremely helpful.
Could you make your strips wider to make a larger star I would like my star to be in the center of the quilt but would like it to be a lot larger more like the large Dahilia center Thanks
How to make a full size lone star quilt?
Carmen,
Thanks so much for your question! I have updated this post with a couple of items at the end of it. One is a link to a PDF that includes a table for increasing the width of your strips to create a larger star. It shows you how large your block will be with the size increase. I have also added a page with links to all of my lone star projects, and one of them is a quilt with both larger and more strips which you might enjoy seeing. I hope you’ll check them out and see if they can help you. And of course, questions are welcome!
Nettie,
I have updated this post with a PDF for increasing the size, and also have added a page to my blog with links to other lone star projects I’ve completed. One of them is a 64″ lone star with 5 strips which you might enjoy seeing. I hope you’ll check them out and let me know how I can help you! Thanks so much for visiting! -Jennifer
Lena,
Somehow your comment was lost in a sea of spam and I didn’t see it until now. I have updated the post with a PDF that includes measurements for 2.5 strips as well as other sizes. I hope you’ll check it out and see if it helps. Jennifer
Catherine,
This reply is shamefully late, but I have updated my post to include a PDF with information about changing the size of the block. I don’t know if you’ve already made one or are still interested, but if you are please check it out! Jennifer
Thank you so much! Great tutorial easy to follow even for me a beginner please keep posting other nice patterns too.
wow … you make this beautiful block way less intimidating! now instead of being “afraid” of the block, i’m back to stressing over the fabrics LOL … thank you SO much for this tutorial. it’s going in my favorites for future reference. Happy Holidays!
I love yr tutorial…I’ve never made one of these beauties but scared I’ll screw it up. Really…w yr tutorial…w pics I’m going to give it a try…it’s so detailed in yr tutorial I think I can do this…you’ve inspired me..thank you!!
Kathy
Hi, Can I make the lonestar using fat quarters? I suppose I could only make the star about 15″ wide since the fabric would be 22″ long.
Thanks!
Thank you so much for sharing this online I really appreciate it, have wanted to do one of these for years…and now I just did one, small one but now I want to do a whole quilt.
Great tutorial! Your blocks are beautiful!!! Can’t wait to try it out.?
Thank you so much for sharing! 🙂
Excelente tutorial! Obrigada! Sucesso! Felicidades!
My daughter wants to make this quilt block as a quilt for her doll. What are the overall dimensions of this block? Thank you
Hi Amy!
The quilt block in the tutorial finishes at 14.5 inches square. If you want to make a larger or smaller block, try downloading my free PDF which gives measurements for adjusting the size of your block. I hope she has fun!
hi!
I’d love to make the Loe Star block, but I can’t seem to download the pdf file (though I followed the steps…) is there another link? thx!
I made this block for a Bee. I wanted to thank you for such clear instructions. It’s not perfect, but it’s fairly close! Thank you!!!
Mathilde,
Thanks for letting me know! I just emailed it to you. Sorry you had trouble with the download.
very informative
very informative
I love the lone star tutorial. Only came upon it today. Will start doing it tomorrow. Will send picture of 1st one
Bellissimo..grazie
For the Lone Star tutorial the instructions seem very good Pat. If I am to make one and follow your instructions I can not find the break down of the amount of fabrics need to go w this? Am I just not seeing it? Thank you.
Leslie, I am confident that my tutorial will help you make an accurate lone star block. If you are looking for instructions regarding fabric to make an entire quilt, I’m sorry to say that is not included in this post at this time. I just wrote the tutorial to share my method for making the block. I do have a couple of patterns available for purchase which make a larger lone star quilt. I am also working on videos and other lone star related content, so there will be more available soon!
I want to download the pdf and it won’t let me. I signed up for your newsletter, but it won’t confirm it for me.
I really like this tutorial. Perfect instructions. I’ve always wanted to make a lone star and I feel like I could with this pdf. Help
Thank you so much for sharing your tutorial I am making a shirt quilt and this will become the center piece.
A bunch of thankyou for nice tutorial
Es una estrella preciosa….siempre he querido hacerla gracias por el tutorial, solo me complicó en escoger las telas .Desde mi Colombia bella un abrazo.
Gracias.
thank you – très belle explication –
Beautiful ! thank you for your explications –
I dont speak englisch I am French
very very beautiful !
Would you recommend making the quilt for first .quilt. I love this pattern. How long/big do the strips need to be to make a queen size quilt? Your tutorial is great and very easy to follow.
Thank you
Increíble. Me encanta el patchwork, hago una pocas cosas. Este tutoríal está muy bien explicado. Me animaré y lo haré. Gracias
Thank you for a very clearly explained! Greetings from Argentina
Hallo have much sehr über diese präzise Anleitung gefreut. Meine Damen haben nur darüber gesprochen wie es zu machen ist. Sie wollen den lone star auch nähen. Vielen Dank für diese Hilfe.
Thank for sharing this, teaching it so easy to understand.
Beautiful!
Thank you Jennifer!
I have never made a quilt much less starting with a daunting Lone Star pattern. For my quilt I’m using my husband’s shirts to make the stars as he had recently passed. Also, using half a star (four points) on a 16” pillow will be for the grandkids.
What a breeze to create something so beautiful with your easy-to-follow instructions❤️
Sandy,
Thank you so much for your comment. I am sure your projects will be treasures to all your family. I am so sorry about the passing of your husband. Hugs to you.
Jennifer
Realized I had never commented here before that this tutorial was a big help in making a top in 2022 for a Lone Star wall hanging that this year became the first I’ve finished of this style of quilt!
Vivian, that is great to hear! I’m so glad that you finished it, and grateful that my tutorial was helpful to you. I hope you love your quilt!