
Scrappy Hunter’s Star Tutorial (a layer cake friendly pattern)
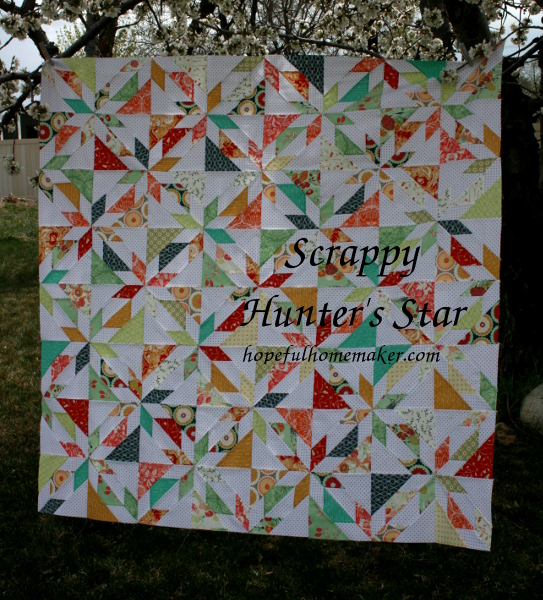
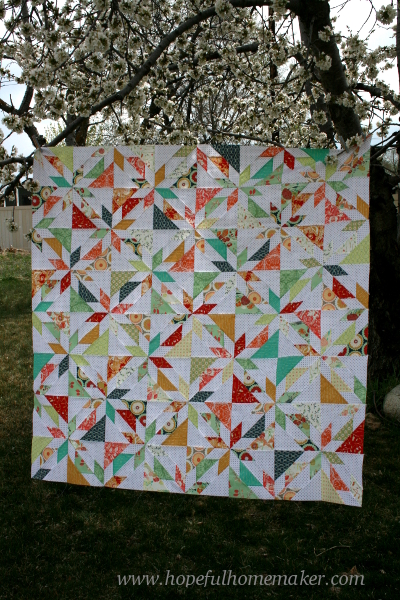
Early this week I shared photos of my scrappy version of a Hunter’s Star quilt . I realized when I was finished with it that I had stumbled on a great pattern for a layer cake, so I thought I’d share a quick tutorial.
Fabric requirements:
Each 8 pointed star in a hunter’s star quilt is made up of four smaller blocks. For the quilt I made, which is 64 inches square, I used:
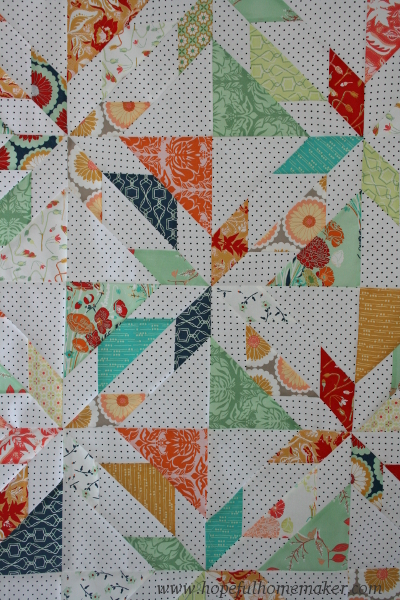
32 – 10 inch squares of various fabric prints (which is most of a layer cake, although I cut my own squares from Bonnie Christine’s Reminisce collection for Art Gallery Fabrics) 32 – 10 inch squares of background fabric (2.5 yards of fabric. I used a black on white swiss dot print for my background) Note: If you’re using a layer cake, you should have 40 prints to choose from. I recommend eliminating those prints that most closely match your background fabric so they don’t get lost in the quilt and make it more difficult to see the pattern. For example, if you’re using a solid white background and the layer cake has a solid white print in it, or a white print with a very light pattern on it, you may want to skip it. That said, you can see in the photo above that I did use some low volume prints from the collection in my quilt top. I liked using a few of them, but there were other prints that were even softer which I set aside and didn’t use in this project. Also, because I used a swiss dot print for my background, the softer prints I included still looked different from the background fabric.
If you want to increase or decrease the size of the quilt, know that one print and one background square will make two blocks. Four blocks will give you a full star in the center of the blocks.

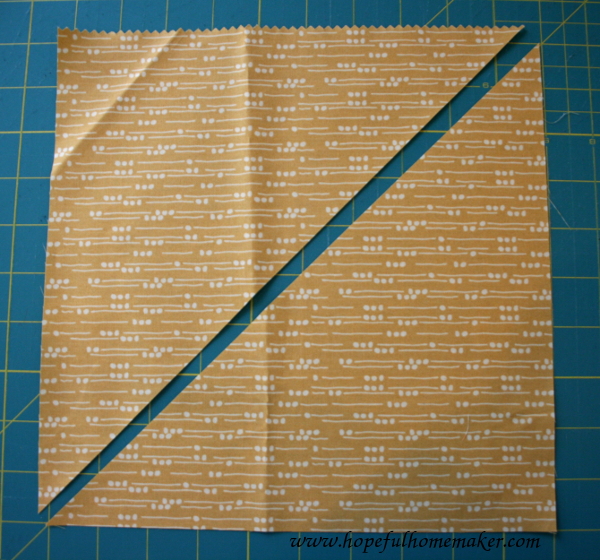
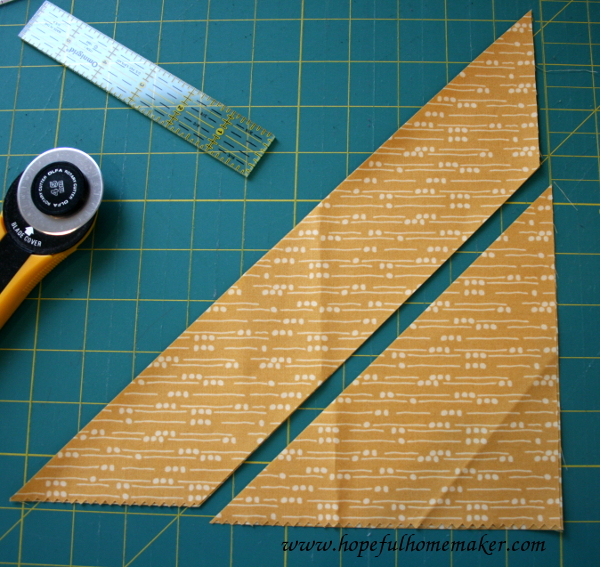
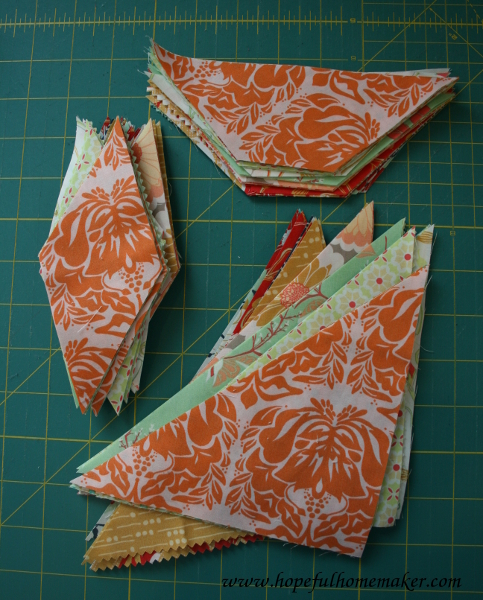
To make the blocks, we’ll be cutting triangles, diamonds and trapezoids from each 10″ square. To begin, cut your square in half diagonally:
Place the two triangles on top of one another for faster cutting. With a ruler, measure 2.5 inches from the edge of the diagonal cut, as seen below with the small ruler. Notice that on the bottom left and top right edges of the triangle my cutting ruler is more than 2.5 inches from the point of the triangle. The measurement that matters is the one from the diagonal edge we just cut.
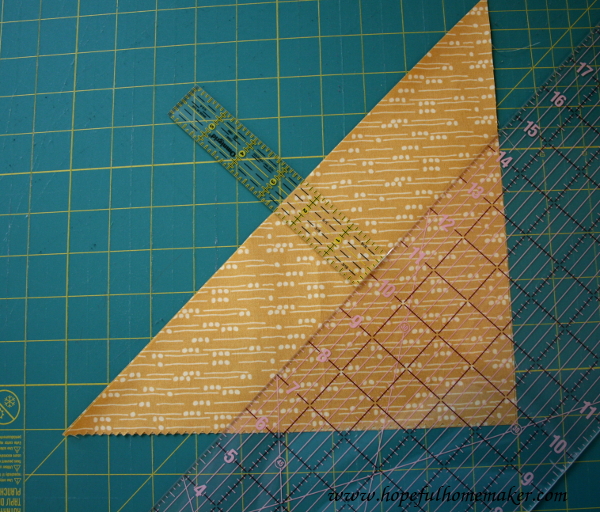
Cut along that line, creating two smaller triangles and two trapezoids.
Set aside the triangles and line the trapezoid strip up carefully on your cutting mat. I prefer to use my 45 degree angle lines and I line the far right edge up on an inch line. From that far right side, measure into your trapezoid 2.5 inches once more.
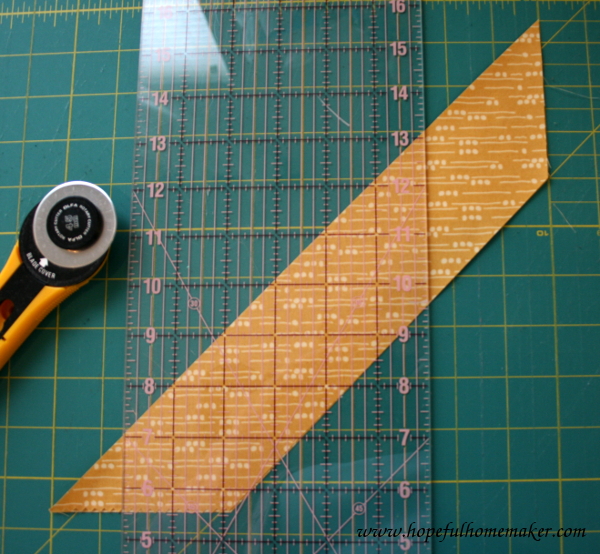
Cut your fabric, creating two diamonds. Repeat once more, measuring another 2.5 inches from the cut you just made and cutting two more diamonds.
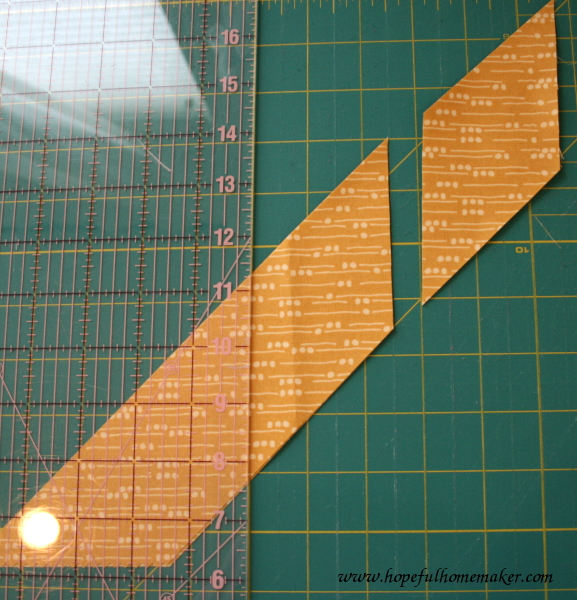
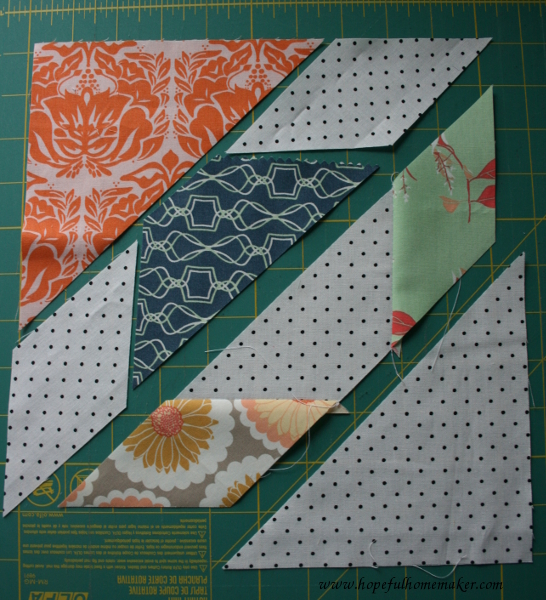
From one ten inch square you should now have two triangles, four diamonds and two trapezoids.
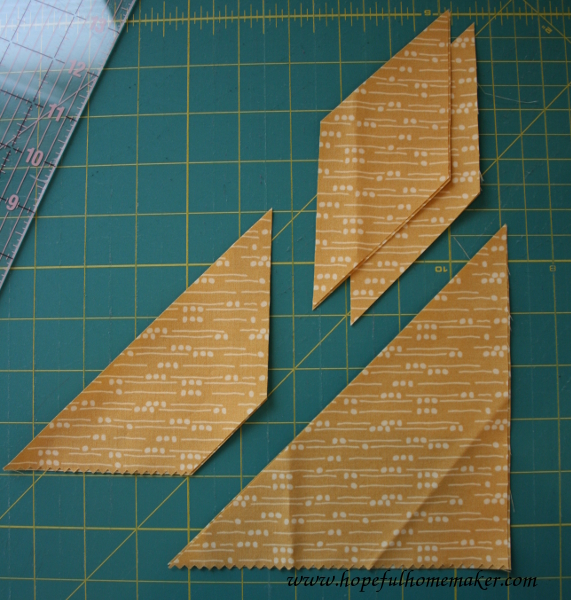
Repeat this process with the remaining prints.
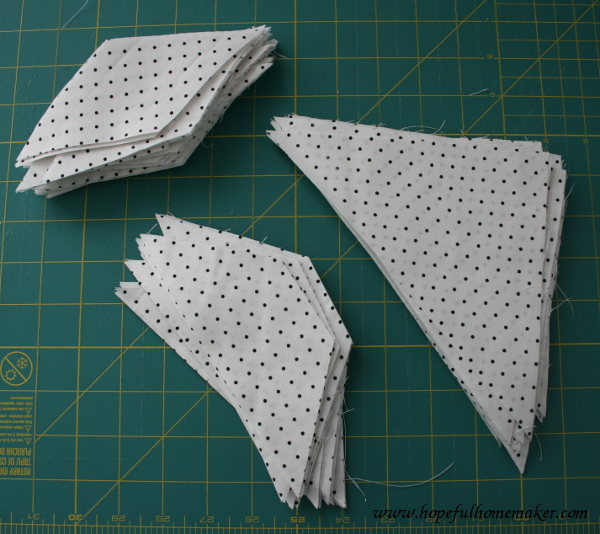
Now do the same thing with all the ten inch background squares. Every piece in this quilt is cut the same way.
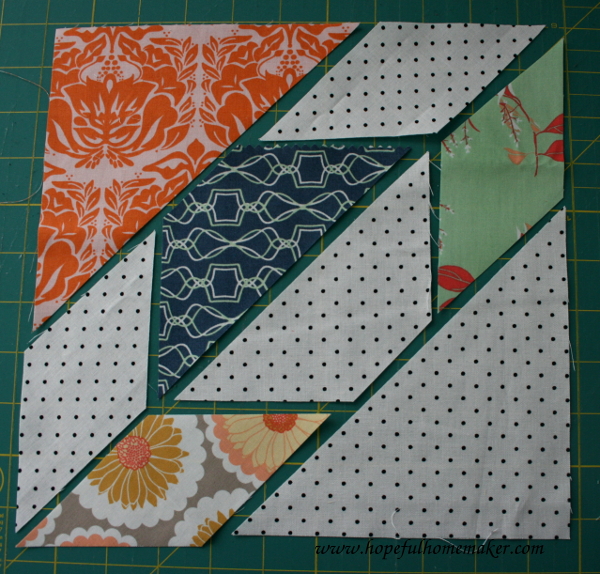
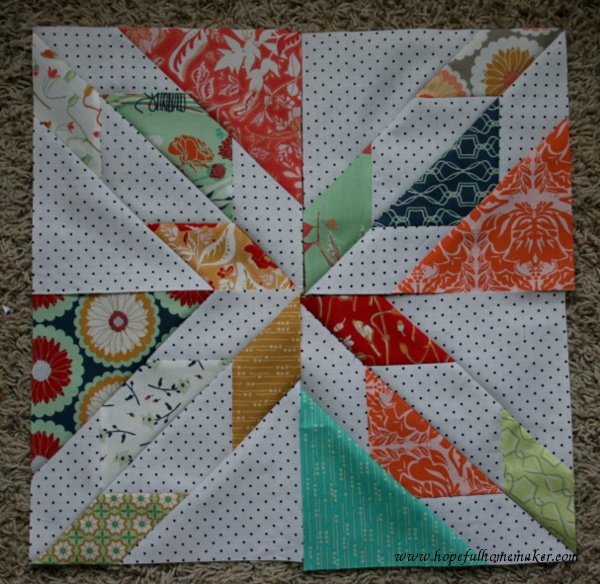
Once all the shapes are cut you can put together a block. Think of each block as having two triangles. One uses background fabric for the diamonds and prints for the triangle and trapezoid, and the other triangle uses background fabric for the trapezoid and triangle and the diamonds are prints. Below is the layout for a hunter’s star block:
Sew the diamonds first. Carefully turn a printed diamond piece right side down and carefully line it up with the right side of a short end of the background trapezoid. Because we are sewing angles, do not line the pieces up from corner to corner. Instead you will need to have a tiny (1/4 inch) triangle sticking out on each end. This will allow your fabrics to line up straight after you sew them together.
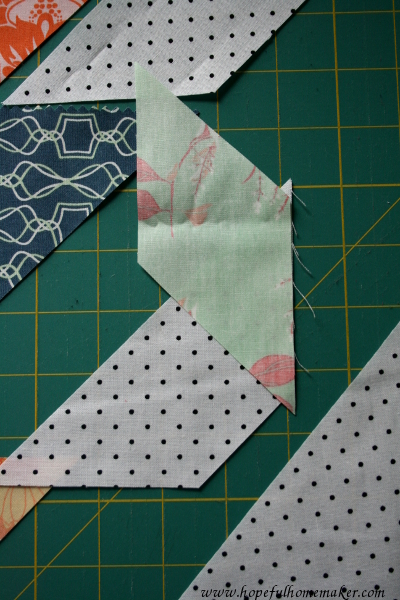
Here’s a closer look at how to line them up. Sew the pieces together using a 1/4 inch seam allowance.
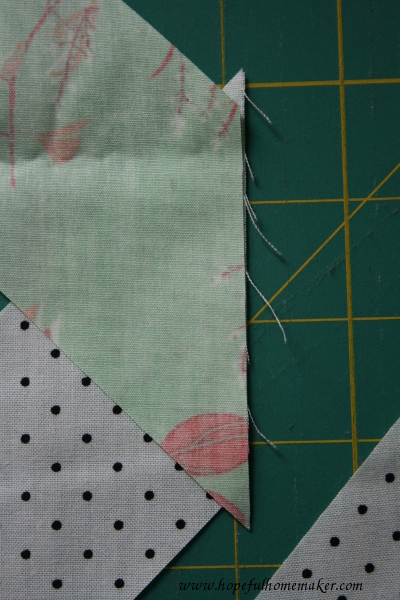
Do the same thing with the diamond at the other end of the trapezoid.

Press the seams open. *In this quilt I pressed every seam toward my printed fabrics so the seams would nest when pieced together.
Now repeat the process, sewing the background diamond pieces to the printed trapezoid piece, again ironing the seams toward the print.
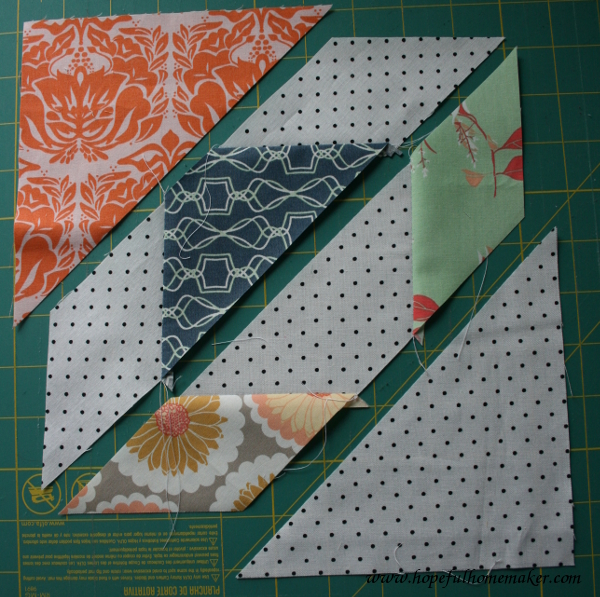
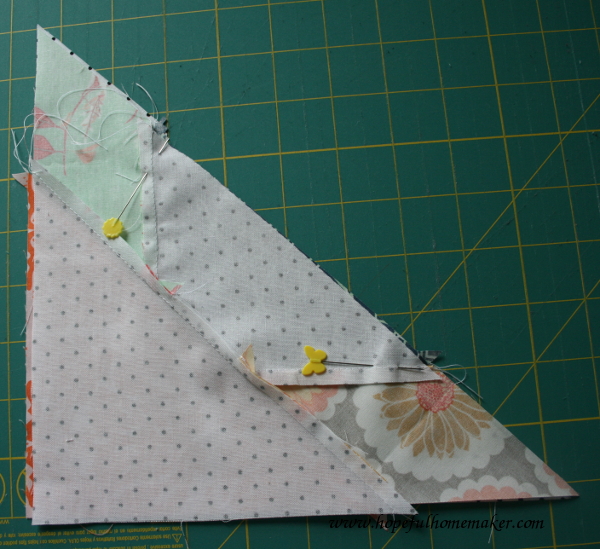
Next, sew the triangles to the trapezoids. Once more, you will have the corners of the triangles hanging over the edges of the trapezoid piece. On this seam the overhang will likely be more than 1/4 inch, which is fine. Just try to center the triangle as best you can with equal overhang on each side. sew together.
Repeat with the other half of the block. Note: At this point, I ironed the seams toward all the printed fabric triangles, and on the other triangle I ironed my seams toward the printed fabric diamonds. If you do this, your seams will nest when piecing together your quilt top.
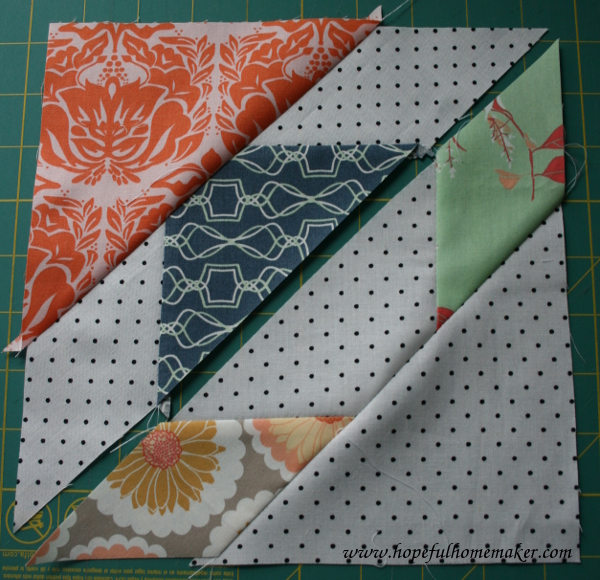
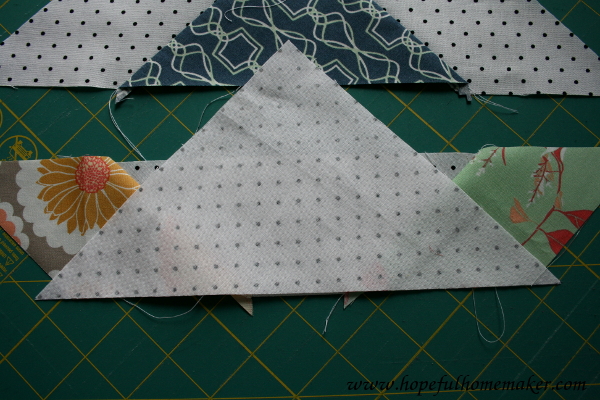
And finally, sew the two triangles together. The most important thing is getting the seams between the diamonds and trapezoids to nest together (see where my pins are).
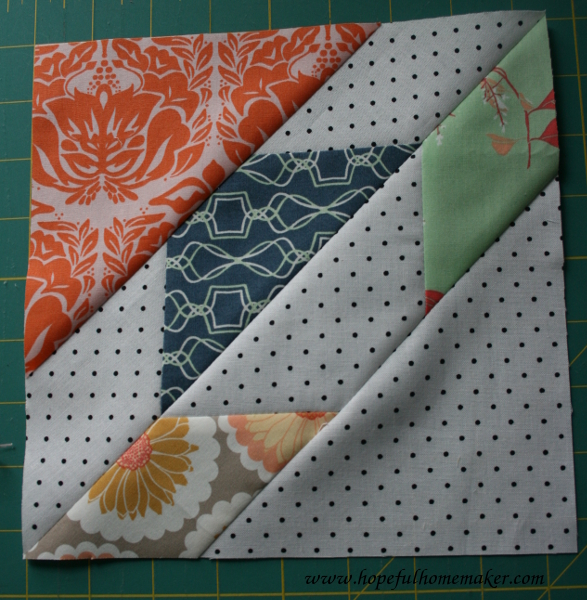
Once again, press the final seam toward the printed fabric diamonds. Your block is finished! Once you have the hang of the block, chain piecing them together is very fast and efficient. I chain pieced a diamond to one end of every trapezoid, then did the same thing with the other end. Finally I chain pieced all the triangles on and then sewed the blocks together. It really is a very fast finish.
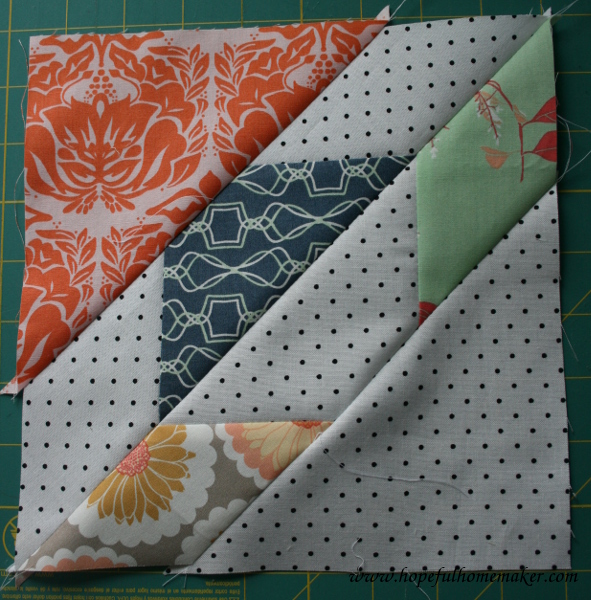
Trim each block carefully to 8.5 inches square and you’re done with the block!
When you’ve pieced your first four blocks together you will see the 8 pointed star that emerges in the corners of the blocks. This really is such a beautiful block.
Lay out your blocks in 8 rows that are 8 blocks long (each block making 1/4 of an 8 pointed star) and sew them together, paying careful attention to matching the seams on the diagonal points and in the corners. Sew the rows together and you have a finished quilt top! I really love the scrappy look of this quilt, as it freshens and updates the traditional hunter’s star block in a beautiful way. If you want to see what a quilt would look like in just two colors, you can see my traditional red and white Hunter’s Star quilt here . You can also find pictures of a Hunter’s star made with solid linen and a single print in my Hunter’s Star pillow here . There are so many different ways to interpret this quilt block. I hope you have fun!
Jennifer
I was hoping you’d release a pattern or tutorial for this! I have a layer cake that I couldn’t resist and I’ve been waiting for just the right pattern for it. Thanks so much!!
Beautiful! Thanks for the step by step tutorial 🙂
Fabulous tutorial! The step by step instructions and pictures are wonderful! Can’t wait to make one. Thank you!
Thank you for this excellent tutorial! I look forward to making this quilt one day. Yours is beautiful!
I think I’ll have to try this with a layer cake, so very pretty!
E
Thank you for posting your beautiful quilt with such an easy to follow tutorial with great photos.
Love this. This is next in my quilt line up, thank you for posting a tutorial. And for running a blog about quilting with little ones underfoot. 😉
Love your Scrappy Hunter’s Star! I found your design while searching for a pattern made with 10″ squares. Thank you for an excellent tutorial. Mine is more than halfway complete and is currently on my design wall. I am already thinking about what colors I should make the next one with. Thank you again for sharing!
Thank you so much for these fantastc instructions. I have wanted todo a hunter star quilt for years and was fearful of all the points and the cutting. I tried a sample block to see how it would go by your instructions and it was so easy. Your instructions were so helpful as to the piecing together and especially the pressing. Now I am ready to pur hase the layer cakes.
Thank you so much for the tutorial and not having to buy another template.
I love your quilt and tutorial. I really love your red hunter’s star. I have an obsession with red quilt fabric! Is the red hunter star constructed in the same easy way as your 10″ square “scrappy” hunter’s star? I’ve never seen such an easy way of making this complicated looking quilt. Thank you so much! I can so do this!
You are brilliant. Seriously. I have always wanted to make this pattern and just knew there had to be an easier way, but I couldn’t figure it out. Thank you for doing this and sharing it with other quilters. You rock!
I just printed out your lovely instructions for the ‘Scrappy Hunters Star’ quilt. I am assuming since you cut the blocks to 8.5 inches, that means your finished block is 16 inches. How would I go about figuring how much to cut down the pieces to make a 12 inch block? If you could send me in the right direction, it would be greatly appreciated
Dear Jennifer, Thank you for this. I haven’t quilted for years but got the urge again after seeing a Hunters Cross quilt. I thought it looked too difficult but after finding your tutorial I feel inspired again. God bless you.
Thanks for a fantastic tutorial. Can’t wait to try it!
Thank you sewww much for this tutorial. I knew there had to be a better way for the Hunter’s Star. Your tutorial makes sense and is easy to follow. I have put off so long making this for my son who happens to be an avid hunter, providing for his family. This is the perfect pattern. Am incorporating a log cabin in this. Thank you multiple
Theresa Akin
Thanks for sharing! I really like this pattern & often thought of how it would look in scrappy… I like scrappy ’cause seems like using same color/pattern would be boring therefore I need to reduce my stashes anyway!!!!
I really love this quilt and the colors it looks so fresh.. Can you tell me how many of the Reminisce range of fabrics you used in this quilt. I have tried to count them but I think some of the fabric is the same. I am having trouble locating a stockist of Bonnie Christine’s fabrics here in the UK but will keep on hunting. Thank you so much.
Oh I am so happy to see this wonderful quilt done in such an easy, straight forward way. I’ve wanted to make this forever. Now I can! I just have to figure out how to do it without using a layer cake because I have too much yardage in my fabric closet! Thanks again for your help and expertise.
I found a layer cake yesterday that I fell in love with. I left it at the store because I couldn’t find a pattern that I liked. Browsing this morning I found this one and I think it will be perfect. Back to the store and the layer cake is now mine! Can’t wait to make the quilt!
I would love to get that great white with black dots you used for the background in this scrappy Hunter star block! Can you tell me the specifics on this fabric? Manufacturer, etc.? TIA!
Pingback: New Quilt in Progress: Scrappy Hunter’s Star | Moore Approved
As soon as I saw this tutorial on Pinterest, I knew I had to make it! Using an assortment of Kaffee Fassett fabrics. All cut and on my design board waiting to be sewn. So easy and absolutely gorgeous block!
Thanks for sharing 🙂
Just stumbled across this….Fantastic!
Just finished making the top using your tutorial and it was super easy and fun! Used a mix of colors and patterns from Kaffe Fassett with a neutral small dot for the solid. Making it for a gift but love it so much will be hard to part with 🙂 Thanks again!
I love this pattern, you have made it look so easy. I can’t wait to try it. Thank You So Much for sharing this tutorial.
Love this quilt the colours are lovely. I have been looking for a quilt pattern to make a quilt for my son (30). I have a whole pile of various sea blues so I think I will use your tutorial which is very clear and sort them into lights and darks. and use the lights as the background, wish me luck. Thanks for the clear instructions.
Pingback: Quilting Tips: Scotch Guard Your Fabric, Marking Quilt Lines, Spinning Seams – Moore Approved
That is a beautiful hunter’s star! Thanks for the tutorial.
Have bought the fabric so here we go thanks for sharing the pattern.
I am planning on making a Hunter’s Star with a batik layer cake and a cream layer cake – I am so glad i found this tutorial!
I just stumbled across this great tutorial. Could you use this same process with 5 in squares? I have a yard of hand dyed fabric I was given as a gift and I want to make smaller stars to get full use out of such a small amount of fabric.
Thanks for the great tutorial. I just bought a pretty layer cake this week and can’t wait to try this method.
Thank you so much for the Hunter Star pattern! I’m new to quilting and I was able to follow your instruction finished a sample block today and was so happy. Off to the fabric store!
thank you very much ,i have been looking for an easy way to do this block . i am looking forward to making a two color one. hope my looks as good as yours
Could you please give me the size of this quilt? Also I am unable to find fabric requirements for the quilt. Is this meant to be the tutorial just for the block? It is am awesome quilt, I love your scrappy colors!
Thank you so much!
Fantastic – I love this star and thank you for sharing the instructions.
Thank you for this tutorial, Once I started, it was like peanuts, couldn’t stop I am having lots of fun with this way of making the hunters Star block.
TerryM Israel.
I had a stack of 10″ squares and wanted to make this pattern. I googled “hunter’s star quilt pattern” and didn’t find what I was looking for, so I figured out the cuts for myself. Then I tried google again, adding ’10” square’ to my search terms. Your site came up — with the same measurements I had come up with. It would have saved me some work, but I know now that I can adapt for different size squares. I was working on this at a retreat and had a lot of people ask about how I cut the blocks. I referred people to your page. 🙂
Julia,
Thank you for your comment! I’m so glad we came up with the same measurements- it’s a great pattern and lots of fun to make!
I am anxious to make this block and the quilt !
I love your quilts and tutorials. Thanks so much for sharing.
This is a wonderful tutorial and your quilt is beautiful. Thank you so much for sharing.
Can I download this somehow.
Excellent use of a 10″ square. TYSM for sharing with so many of us!! Peace and blessings during this traumatic time, Vicki
Thank you very much for this tutorial. So easy to understand and 10inch squares are a great size to work with.
I have always wanted to make a Hunter’s Star but I just didn’t want to have to buy another ruler. Thank you so much for your wonderful tutorial!!!!
I never comment, but this is sooo much better than other Hunter Star tutorials. Just what I was looking for!
This is easiest way to make the hunter’s star!!! Thank you for sharing this tutorial.
Thank you Ruth! I’m so glad you found it useful.
This is absolutely amazing. Thanks for sharing. Love the pattern
I’ve made a hunter star quilt with the templAte from Deb tucker. The ruler was very difficult to follow. You’re method is much simpler. I think I will mAke another one with you’re instructions
Great quilt I am beginner but I think I would like to try this!
What is the size of the finished block?
Absolutely grand ! So different can’t wait to try and step by step tutorial is easy to follow . THANX A MILLION !!
I came across this pattern from your site. I thought I would make it black, white and grey.
It takes a minute to get used to the diagonal cuts and sewing together so it actually matches up to a finished 8.5 square. 6 squares in and I still have to trim them down.
Most importantly I hate “pinked edges” it makes a big difference in putting these together.