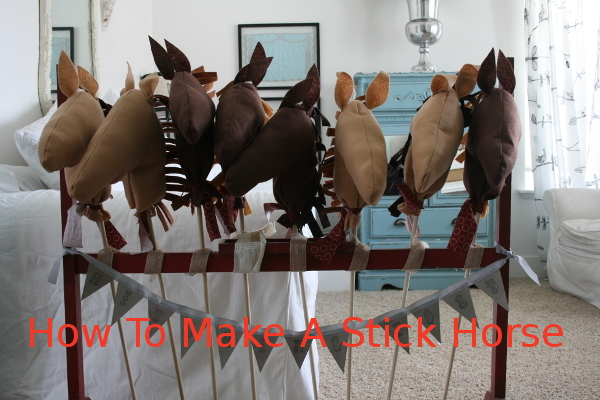
Scrappy Hunter’s Star Tutorial (a layer cake friendly pattern)


scrappyhuntersstarquilt

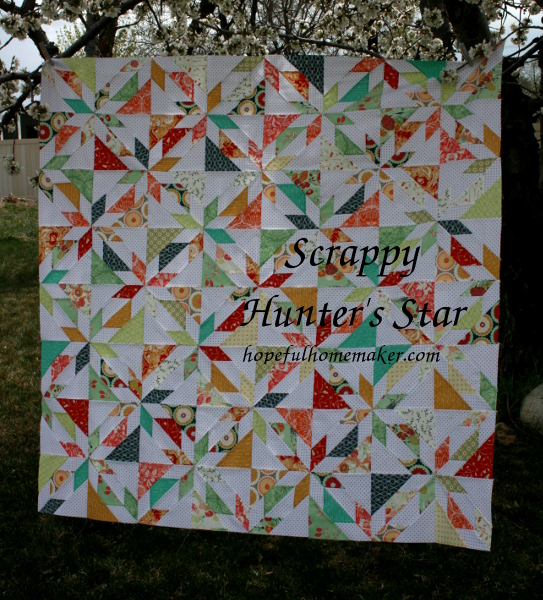
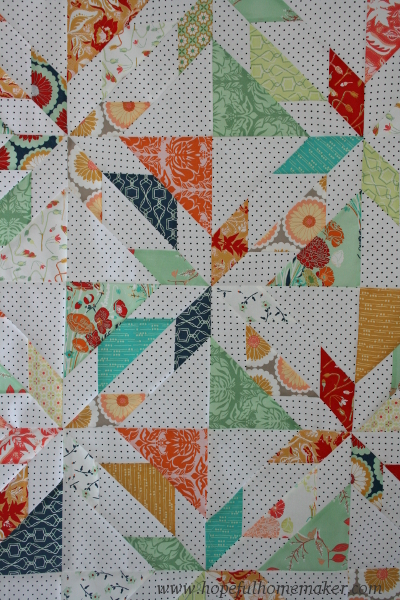
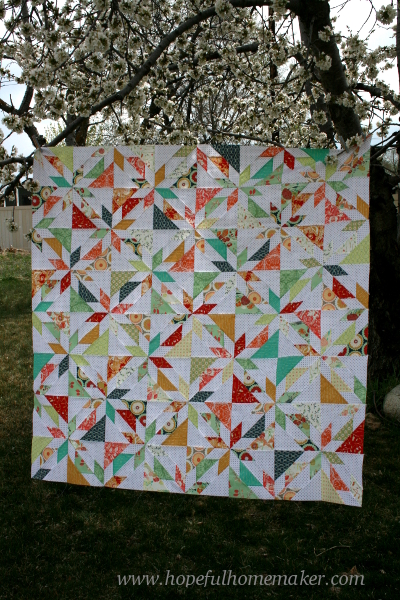
Early this week I shared photos of my scrappy version of a Hunter’s Star quilt .  I realized when I was finished with it that I had stumbled on a great pattern for a layer cake, so I thought I’d share a quick tutorial.

hunterstarwithdots

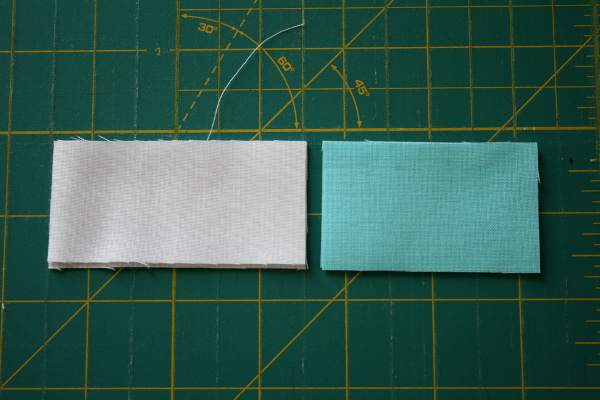
Fabric requirements:

Each 8 pointed star in a hunter’s star quilt is made up of four smaller blocks.  For the quilt I made, which is 64 inches square, I used:

32 – 10 inch squares of various fabric prints (which is most of  a layer cake, although I cut my own squares from Bonnie Christine’s Reminisce collection for Art Gallery Fabrics) 32 – 10 inch squares of background fabric (2.5 yards of fabric.  I used a black on white swiss dot print for my background) Note:  If you’re using a layer cake, you should have 40 prints to choose from.  I recommend eliminating those prints that most closely match your background fabric so they don’t get lost in the quilt and make it more difficult to see the pattern.  For example, if you’re using a solid white background and the layer cake has a solid white print in it, or a white print with a very light pattern on it, you may want to skip it.  That said, you can see in the photo above that I did use some low volume prints from the collection in my quilt top.  I liked using a few of them, but there were other prints that were even softer which I set aside and didn’t use in this project.   Also, because I used a swiss dot print for my background, the softer prints I included still looked different from the background fabric.

If you want to increase or decrease the size of the quilt, know that one print and one background square will make two blocks.  Four blocks will give you a full star in the center of the blocks.

teninchsquares

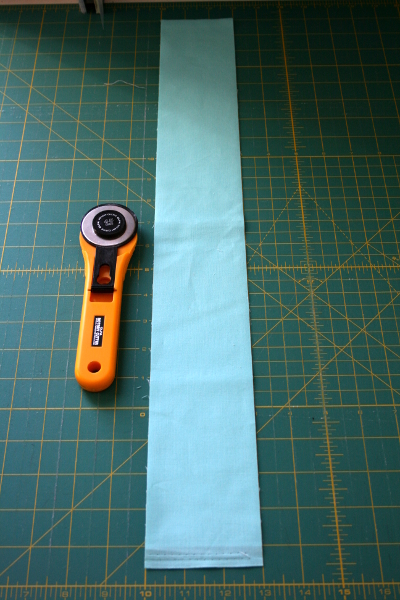
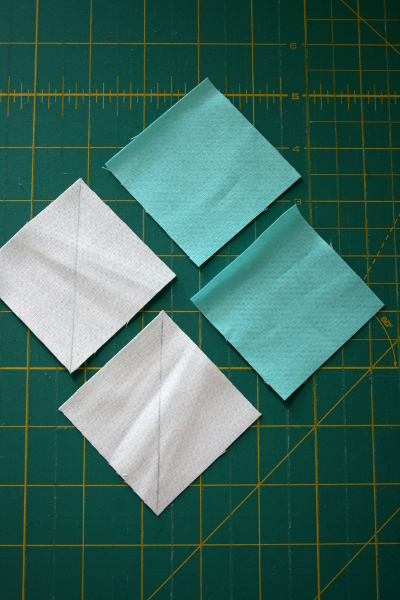
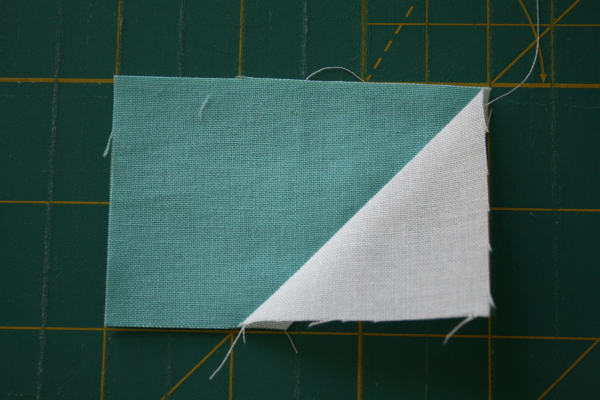
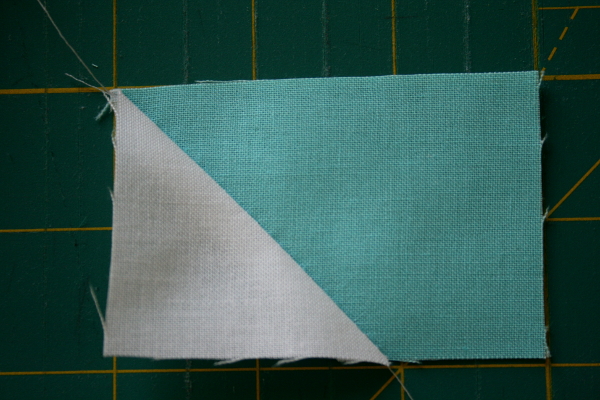
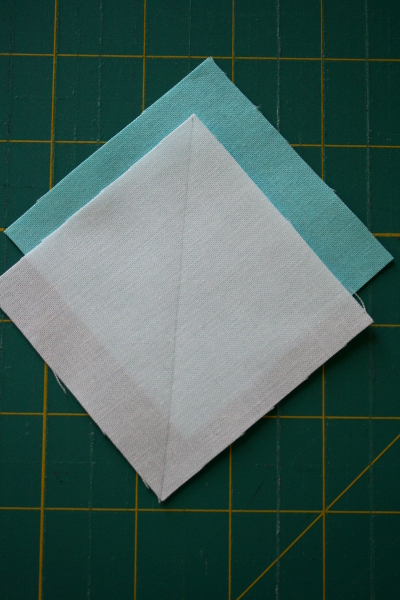
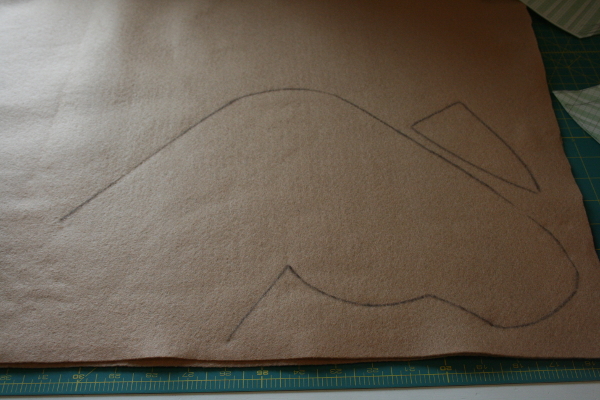
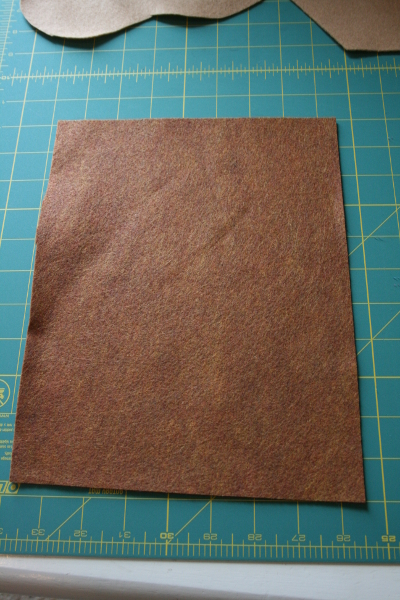
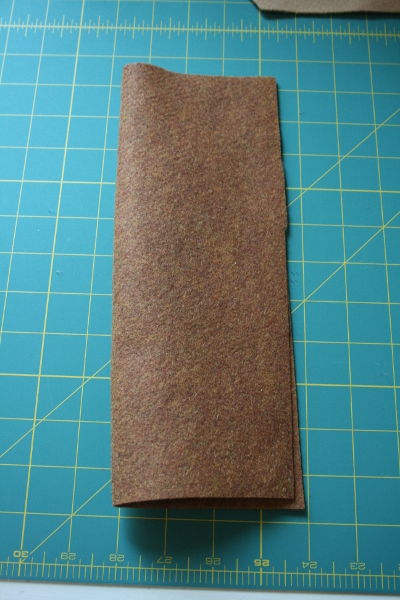
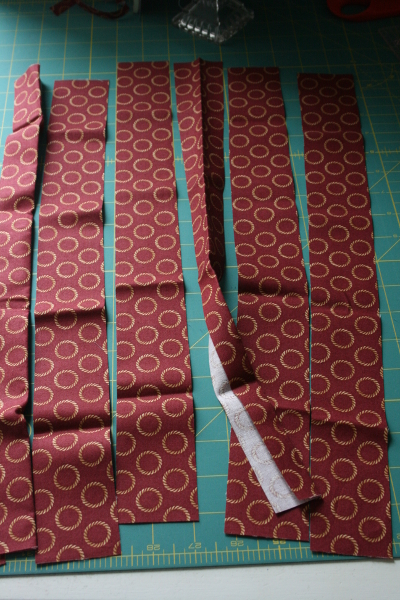
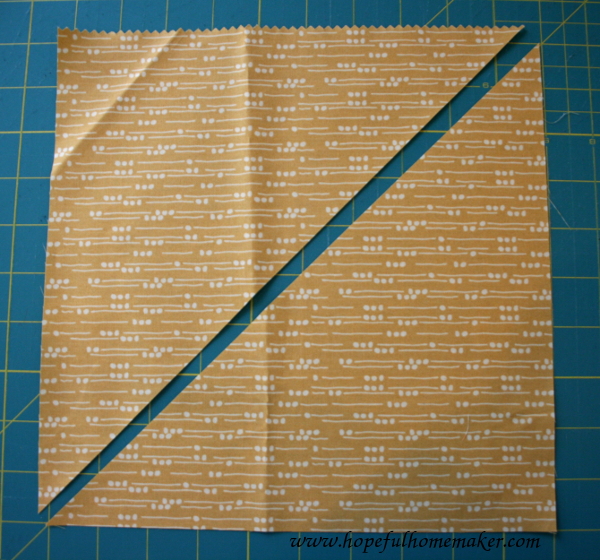
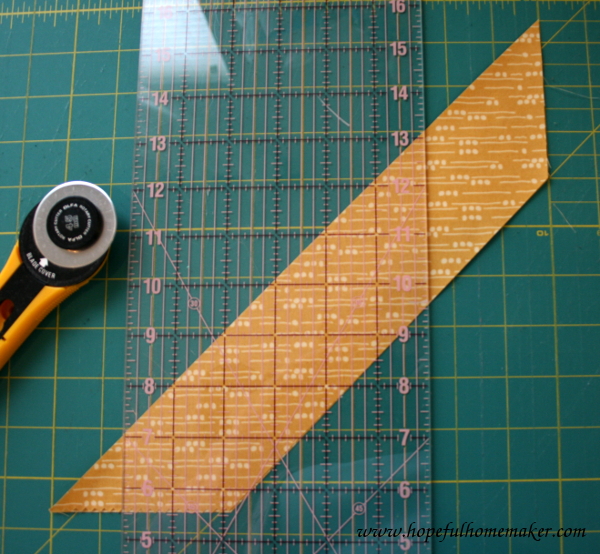
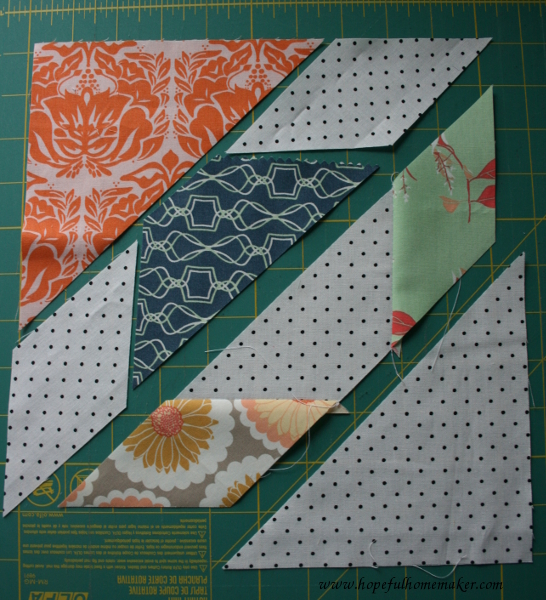
To make the blocks, we’ll be cutting triangles, diamonds and trapezoids from each 10″ square.  To begin, cut your square in half diagonally:

step1

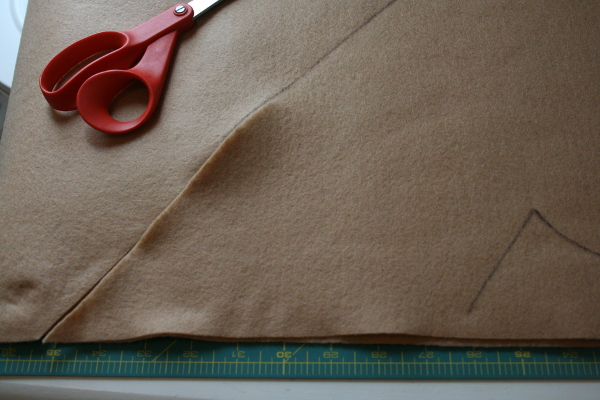
Place the two triangles on top of one another for faster cutting.  With a ruler, measure 2.5 inches from the edge of the diagonal cut, as seen below with the small ruler.  Notice that on the bottom left and top right edges of the triangle my cutting ruler is more than 2.5 inches from the point of the triangle.  The measurement that matters is the one from the diagonal edge we just cut.

step2

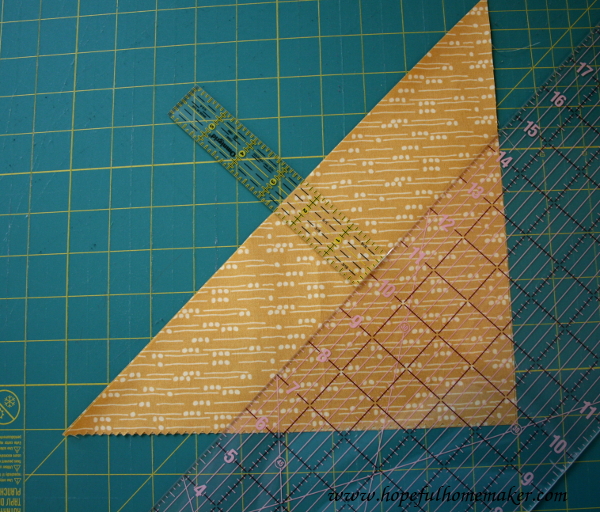
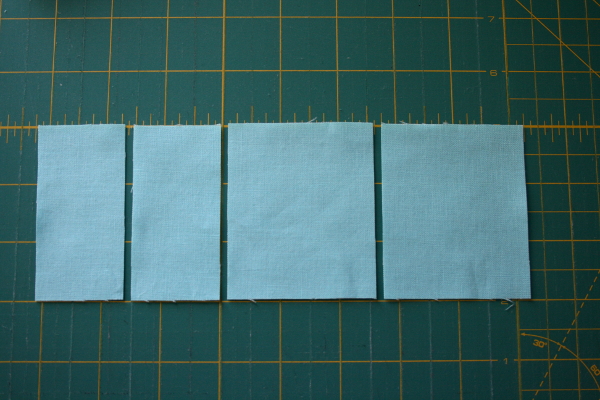
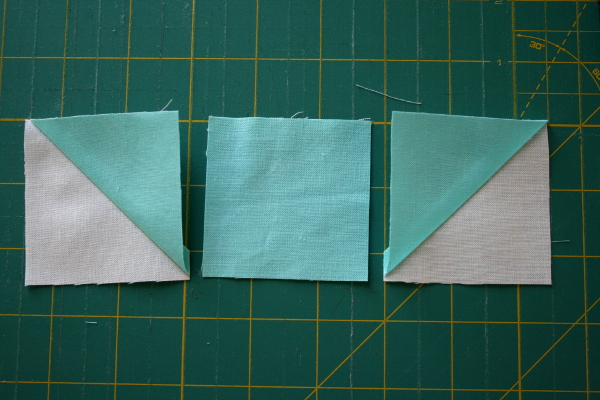
Cut along that line, creating two smaller triangles and two trapezoids.

step3

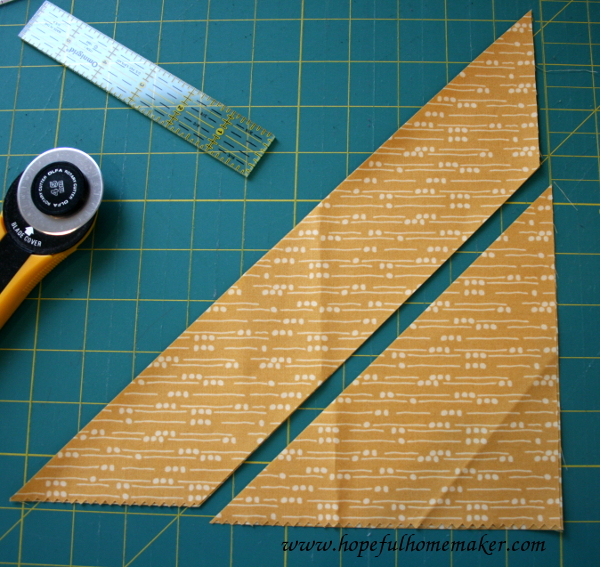
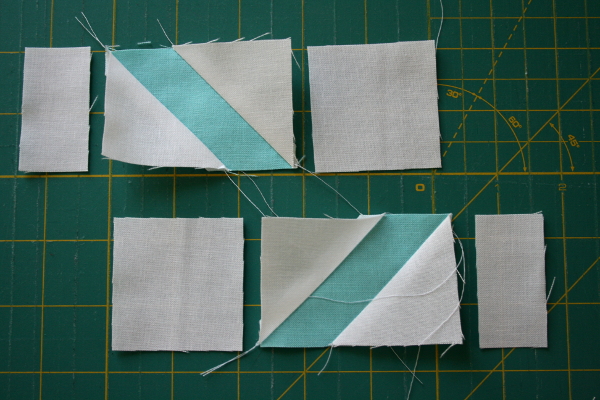
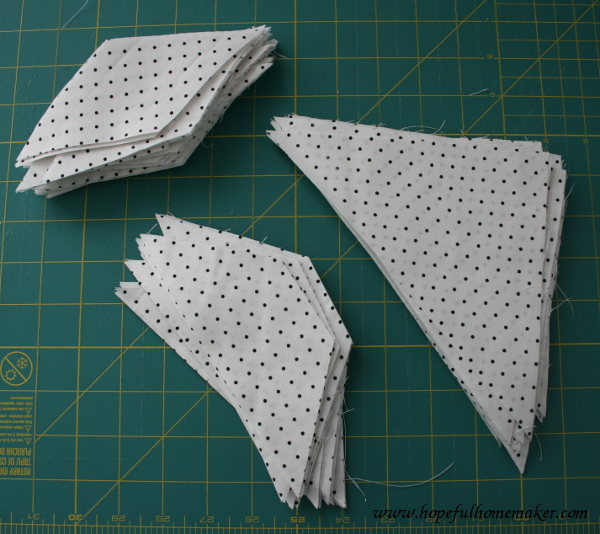
Set aside the triangles and line the trapezoid strip up carefully on your cutting mat.  I prefer to use my 45 degree angle lines and I line the far right edge up on an inch line.  From that far right side, measure into your trapezoid 2.5 inches once more.

step4

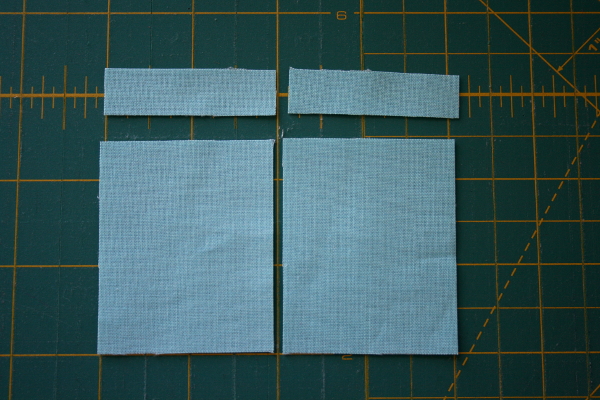
Cut your fabric, creating two diamonds.  Repeat once more, measuring another 2.5 inches from the cut you just made and cutting two more diamonds.

step5

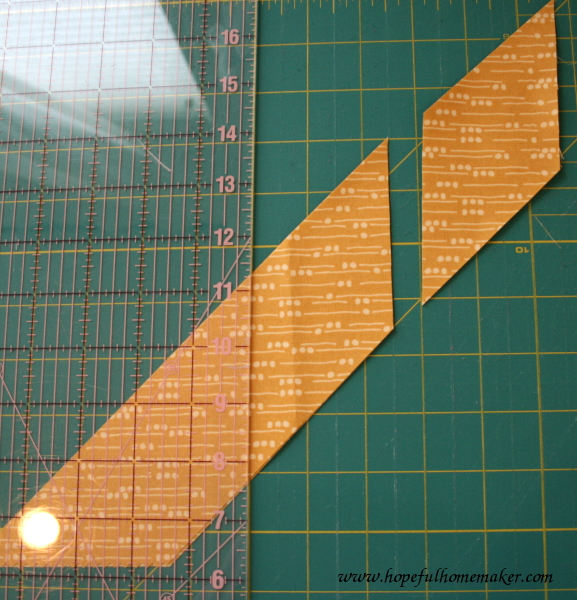
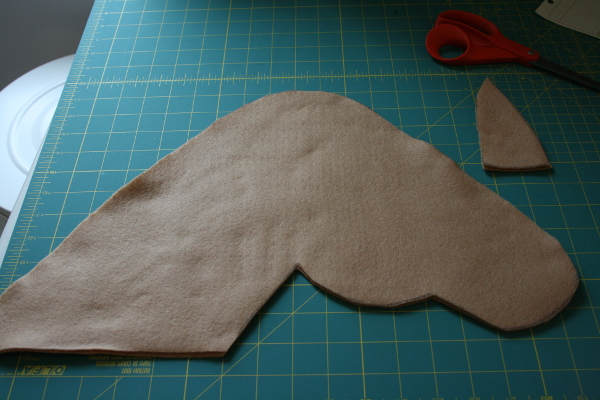
From one ten inch square you should now have two triangles, four diamonds and two trapezoids.

threeshapes

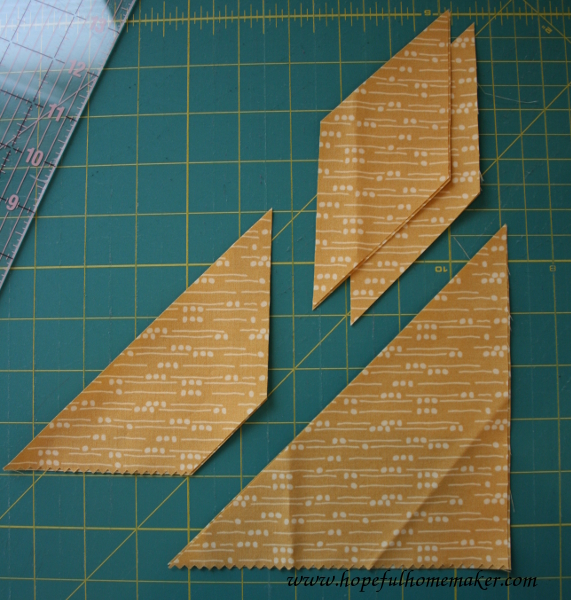
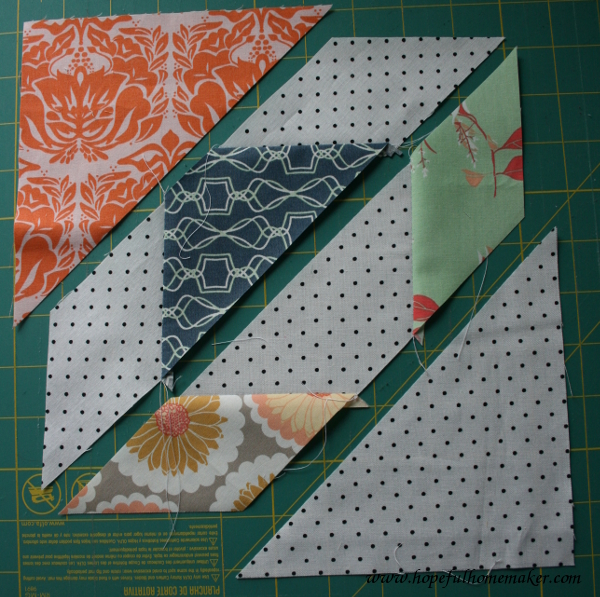
Repeat this process with the remaining prints.

cutallpieces

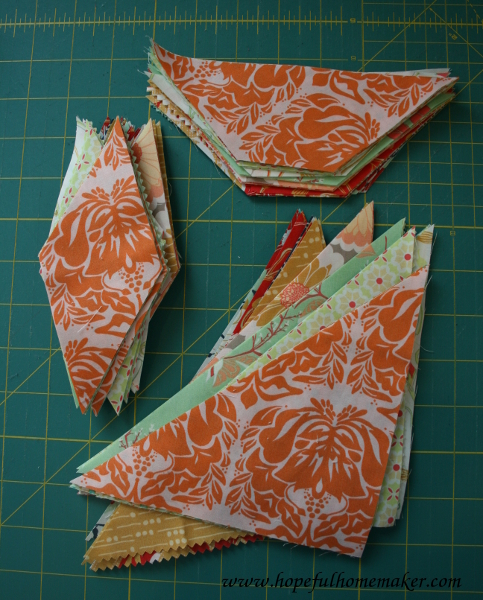
Now do the same thing with all the ten inch background squares.  Every piece in this quilt is cut the same way.

repeatwithbackgroundsquares

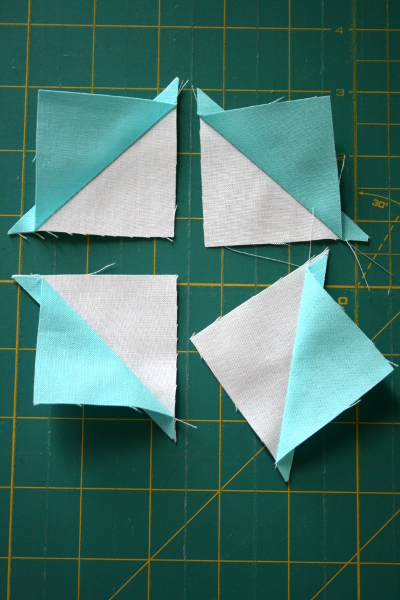
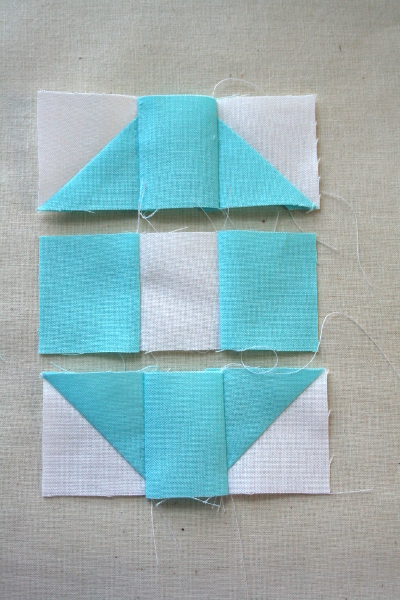
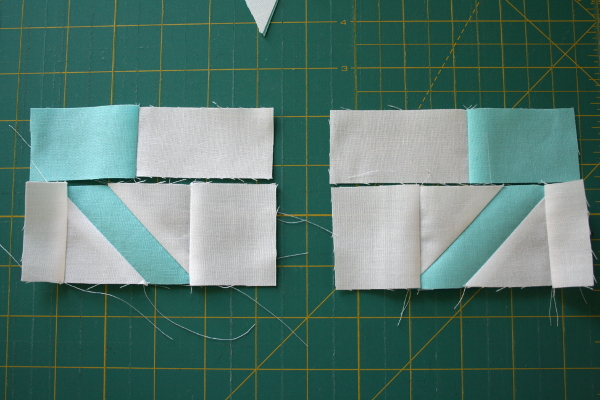
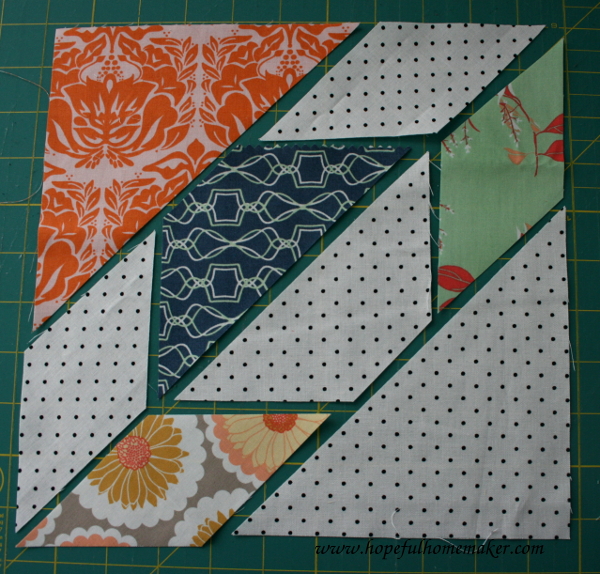
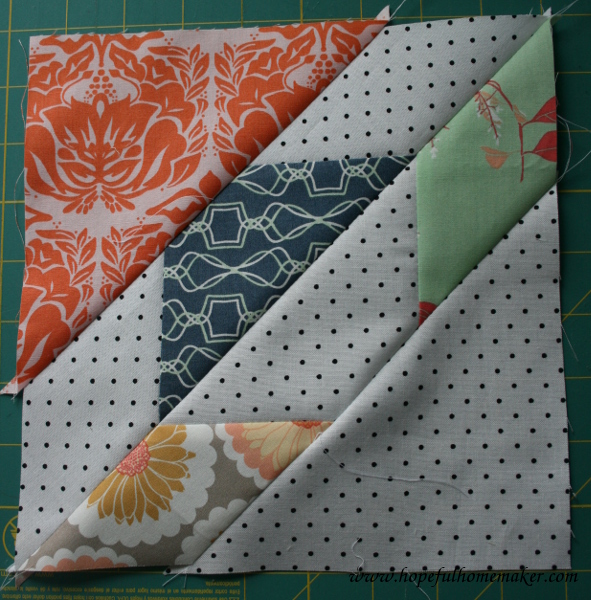
Once all the shapes are cut you can put together a block.  Think of each block as having two triangles.  One uses background fabric for the diamonds and prints for the triangle and trapezoid, and the other triangle uses background fabric for the trapezoid and triangle and the diamonds are prints.  Below is the layout for a hunter’s star block:

huntersstarblocklayout

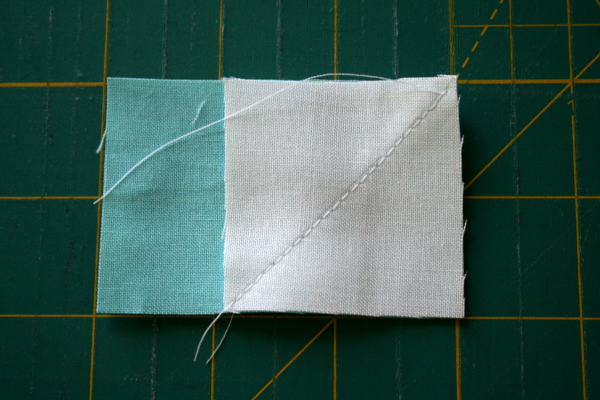
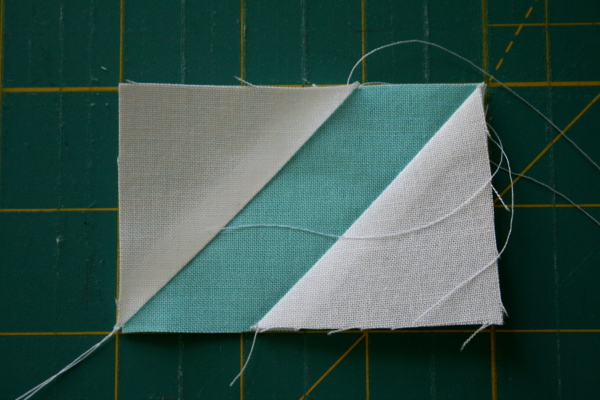
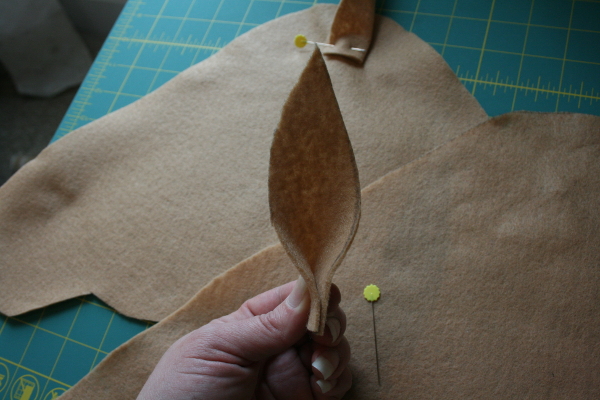
Sew the diamonds first.  Carefully turn a printed diamond piece right side down and carefully line it up with the right side of a short end of the background trapezoid.  Because we are sewing angles, do not line the pieces up from corner to corner.  Instead you will need to have a tiny (1/4 inch) triangle sticking out on each end.  This will allow your fabrics to line up straight after you sew them together.

sewdiamondtotrapezoid

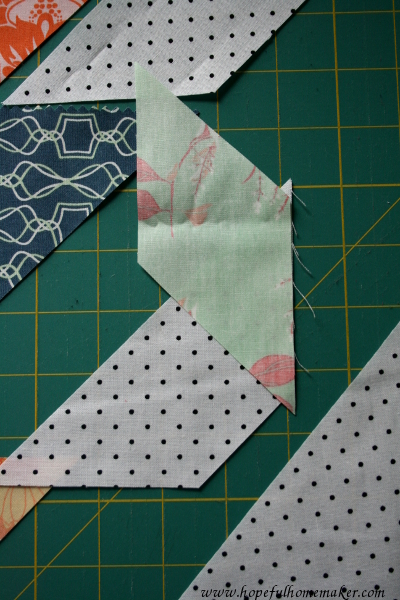
Here’s a closer look at how to line them up.  Sew the pieces together using a 1/4 inch seam allowance.

lineupseam

Do the same thing with the diamond at the other end of the trapezoid.

addseconddiamond

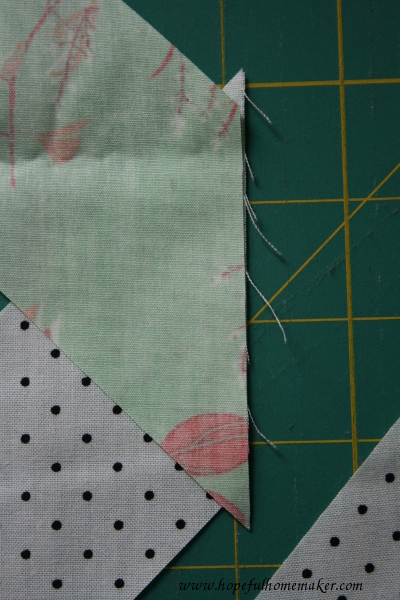
Press the seams open.  *In this quilt I pressed every seam toward my printed fabrics so the seams would nest when pieced together.

pressopen

Now repeat the process, sewing the background diamond pieces to the printed trapezoid piece, again ironing the seams toward the print.

repeatwithotherside

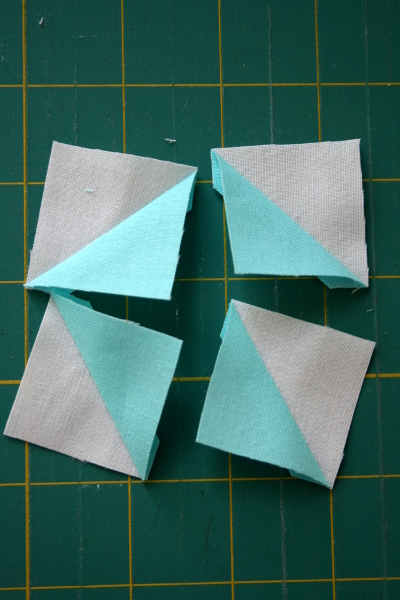
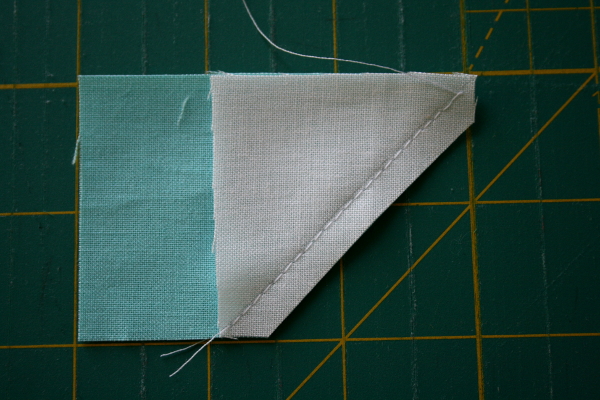
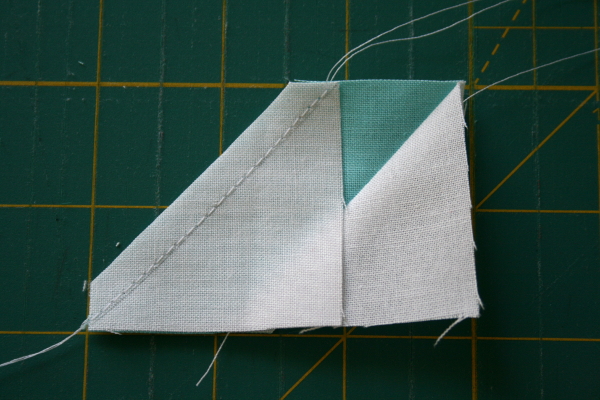
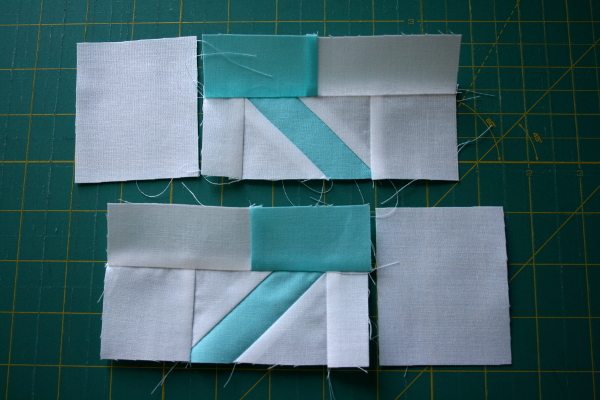
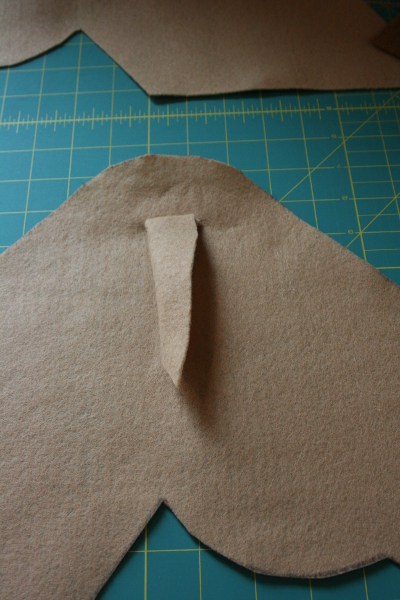
Next, sew the triangles to the trapezoids.  Once more, you will have the corners of the triangles hanging over the edges of the trapezoid piece.   On this seam the overhang will likely be more than 1/4 inch, which is fine.  Just try to center the triangle as best you can with equal overhang on each side.  sew together.

addtriangles

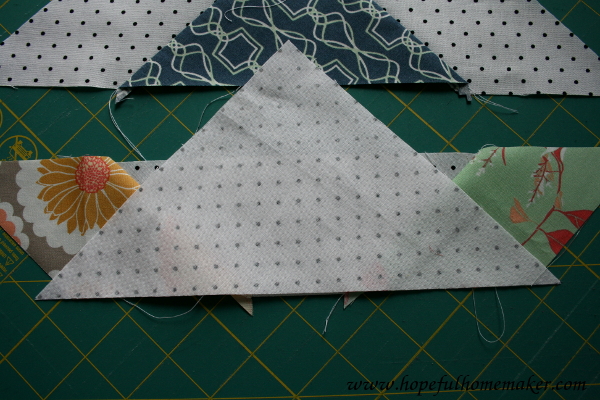
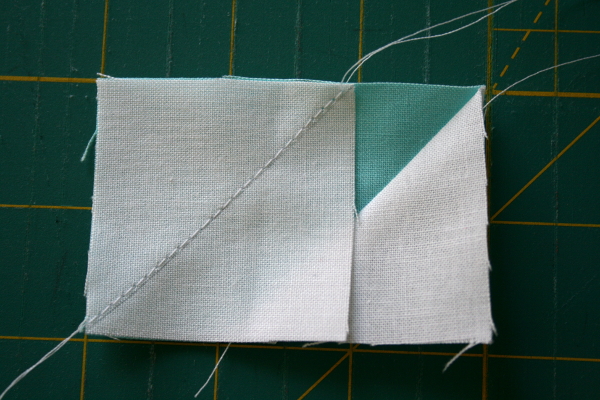
Repeat with the other half of the block.  Note:  At this point, I ironed the seams toward all the printed fabric triangles, and on the other triangle I ironed my seams toward the printed fabric diamonds.  If you do this, your seams will nest when piecing together your quilt top.

bothsidesdone

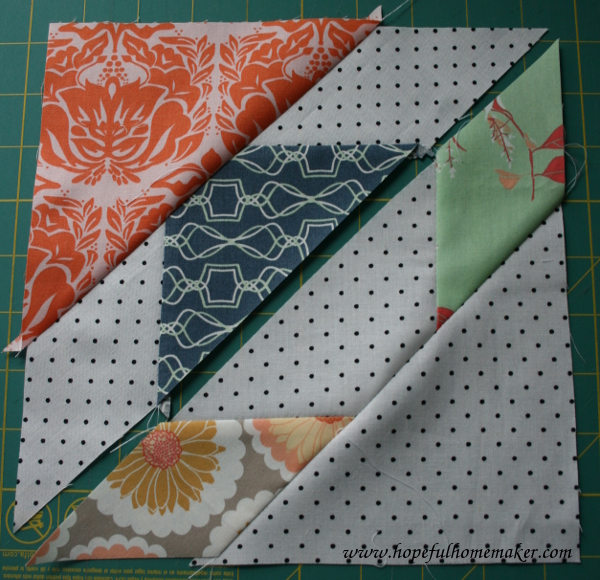
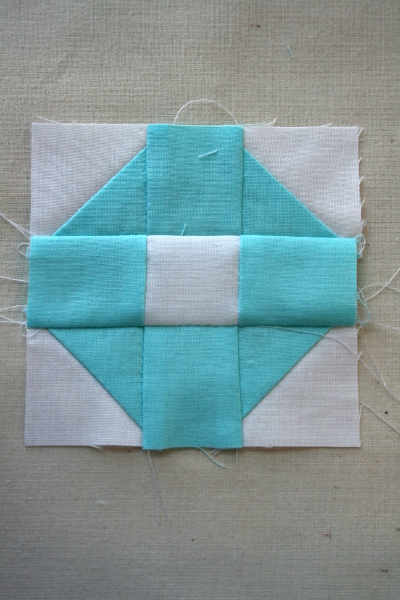
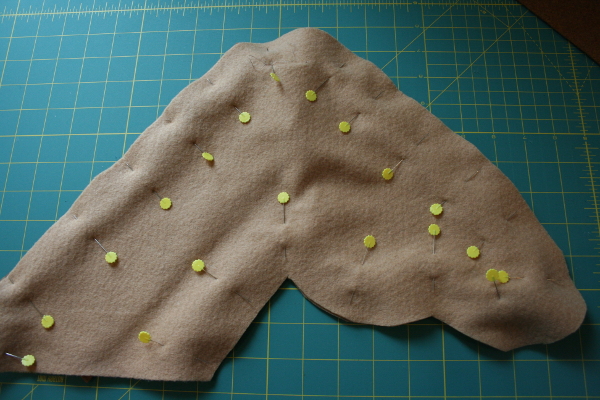
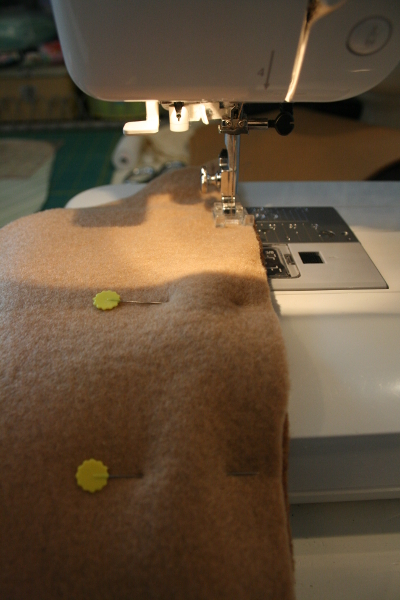
And finally, sew the two triangles together.  The most important thing is getting the seams between the diamonds and trapezoids to nest together (see where my pins are).

sewsidestogether

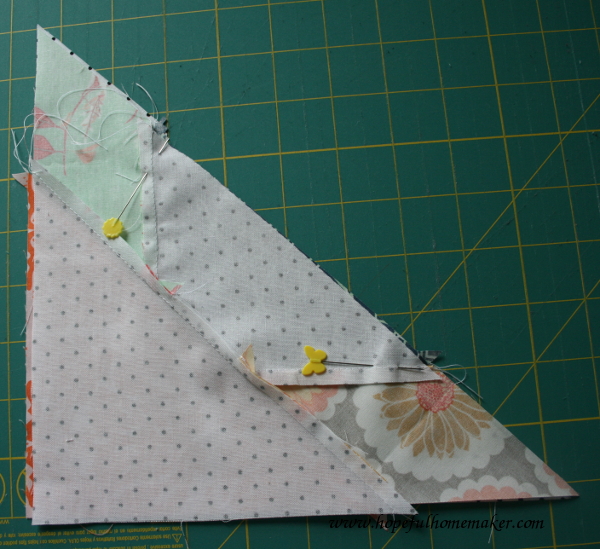
Once again, press the final seam toward the printed fabric diamonds.  Your block is finished!  Once you have the hang of the block, chain piecing them together is very fast and efficient.  I chain pieced a diamond to one end of every trapezoid, then did the same thing with the other end.  Finally I chain pieced all the triangles on and then sewed the blocks together.  It really is a very fast finish.

scrappyhuntersstarquiltblock

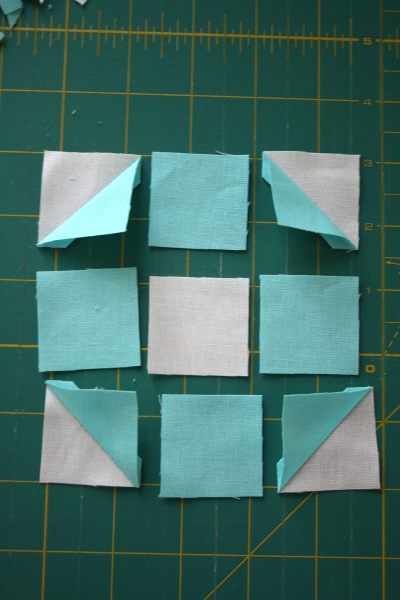
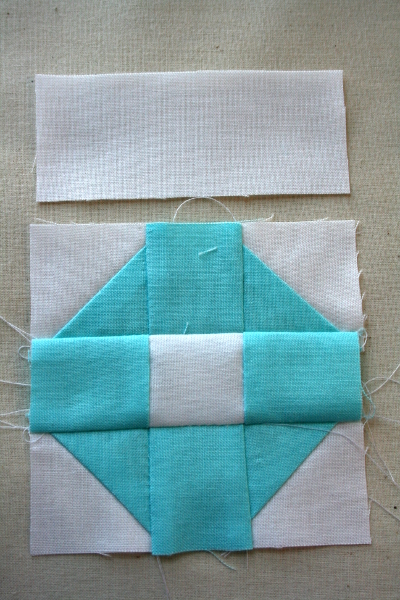
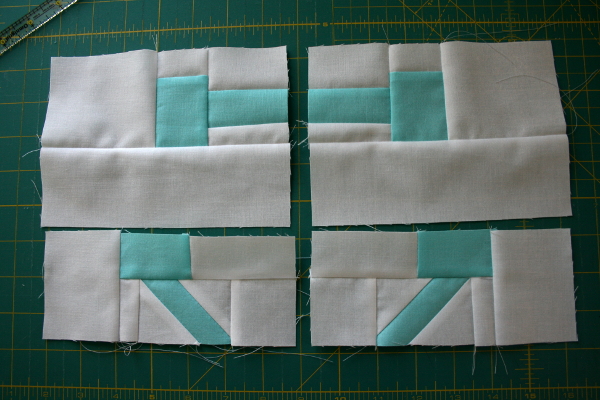
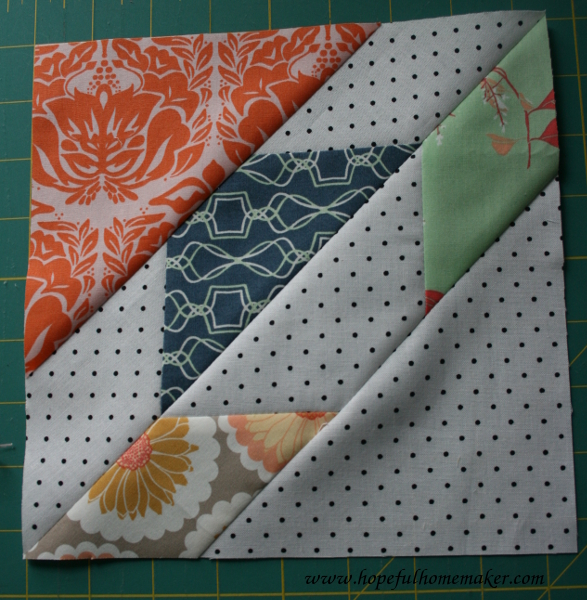
Trim each block carefully to 8.5 inches square and you’re done with the block!

trimblock

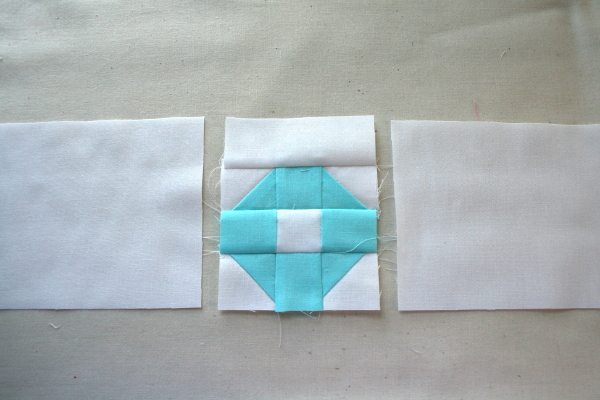
When you’ve pieced your first four blocks together you will see the 8 pointed star that emerges in the corners of the blocks.  This really is such a beautiful block.

huntersstarquiltblocks

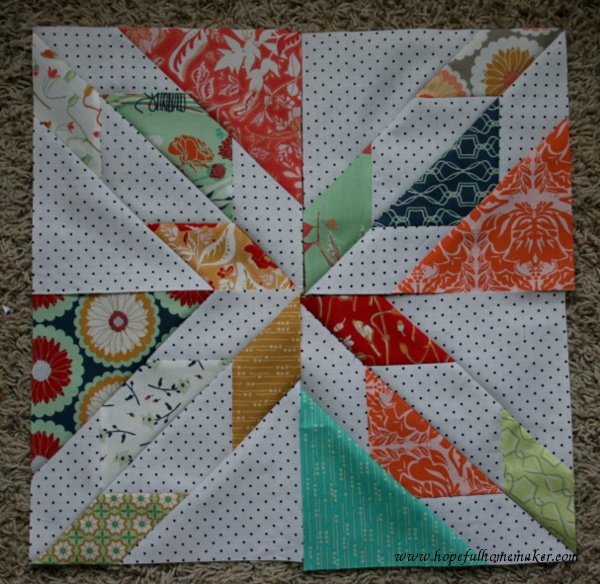
Lay out your blocks in 8 rows that are 8 blocks long (each block making 1/4 of an 8 pointed star) and sew them together, paying careful attention to matching the seams on the diagonal points and in the corners.  Sew the rows together and you have a finished quilt top!  I really love the scrappy look of this quilt, as it freshens and updates the traditional hunter’s star block in a beautiful way.  If you want to see what a quilt would look like in just two colors, you can see my traditional red and white Hunter’s Star quilt here .  You can also find pictures of a Hunter’s star made with solid linen and a single print in my Hunter’s Star pillow here .  There are so many different ways to interpret this quilt block.  I hope you have fun!

scrappyhuntersstar1

Jennifer

Anchor Quilt Block Tutorial


anchortext


anchorquilttop1

As promised, I’ve written a tutorial for the anchor quilt block I designed.  Are you ready?  Let’s go!

This block has a lot of seams and may seem complicated, but if you take it one step at a time it’s really not difficult.

Anchor Fabric Cutting
To begin, the pieces for the anchor can be cut from one 3 inch wide x width of fabric strip.  This means that if you want to make a quilt that has a different print for every anchor, you just need 3 inches of fabric for each one.  If you want to piece a quilt that is all one color then multiply 3 inches by the number of blocks you want to make.  You’ll actually use less than that, but it’s a good way to figure out what you need.

*Note:  There are small pieces in this block, some only 1″ wide.  For more accurate piecing, I recommend using Best Press to starch your fabric before you begin.

anchorblockstrip

From that strip, cut two pieces that are 1.5 inches wide (by 3 inches tall) and two pieces that are 2.5 inches wide (by 3 inches tall).

anchorcut1

Now carefully cut each piece in half, making them all 1.5 inches tall.

anchorcut2

From the three inch strip cut two pieces that are 2 inches wide, then carefully trim 1/2 inch from the top, making them 2 inches by 2.5 inches.

anchorcut3

Cut two pieces that are 2 inches wide by 3 inches tall, and one 3 inch square.

anchorcut4

Cut three squares that are 2.5 inches wide and trim 1/2 inch from the top to make them all 2.5 inches square.

anchorcut5

And finally, cut a strip that is 7.5 inches long, then carefully cut it in half, making two strips that are 7.5 inches long and 1.5 inches wide.

anchorcut6

Each block requires just one of these strips, so if you are using the same fabric for more than one anchor, you only need to cut one of these strips for every two anchors you are making.

And here are all the pieces of the anchor stacked up together:

anchorcutsummary

From  your 3 inch strip, all that is left is a strip that can be used to cut more anchors, and a few tiny scraps, so there is very little waste in this block.

anchorscraps


Background Cutting
Now for your background fabric!  For my background I cut a 2.5 inch strip x width of fabric, a 1.5 inch strip of fabric, and a 4.5 inch strip of fabric.

From the 2.5 inch strip, cut:

2 pieces 1″ x 2.5″ 2 pieces 7″ x 2.5″ 2 pieces 2.5″ square 2 pieces 1.5″ x 2.5″ 2 pieces 3″ x 2.5″ 6 pieces cut and trimmed down to be 2″ square anchorbkg1 From the 1.5 inch strip, cut:

1 piece 6.5″ x 1.5″ 2 pieces 3″ x 1.5″ 1 piece 3.5″ x 1.5″ 1 piece 1.5″ square 4 pieces cut 2″ wide and trimmed down to 2″ x 1″ anchorbkg2 From the 4.5 inch strip, cut:

2 pieces 6″ x 4.5″ 2 pieces 3.5″ x 4.5″ 1 piece cut 3″ wide and trimmed down to 3″ square 2 pieces cut 3″ wide and trimmed down to 3″ x 3.5″ anchorbkg3 And your cutting is done!  I recommend cutting and piecing one block before cutting fabric for an entire quilt.

Let’s start sewing, shall we?

The block is divided into three sections.

Section 1
Section one is the top part of the anchor.  For the first step you’ll need 2 – 2.5 inch squares of background fabric and 2 – 2.5 inch squares of fabric for the anchor.  These four squares will be used to make half square triangles.

anchorsec1a


anchorsec1b

Trim the half square triangles down to be 1.5 inches square.

anchorsec1c

Get the 4 – 1.5 inch squares of anchor print and the 1.5 inch square of background fabric and arrange them as you see below to form the top ring of the anchor.

anchorsec1d

Sew the pieces together into three strips:

anchorsec1e

Sew the strips together carefully:

anchorsec1f

Now add the 1.5″ by 3.5″ strip of background to the top:

anchorsec1g

The last step for section one is to sew a 4.5″ by 6″ piece of background fabric to each side.

anchorsec1h

And section one is complete!

anchorsec1i


Section 2
This section is the most complex and is divided into four parts.

Sections 2a and 2b
These two parts are put together almost identically, except that they mirror one another, so pay careful attention as you piece!

Lay out TWO pieces of each of the following fabrics as you see below:

2 – 1.5″ x 2.5″ background 2 – 1.5″ x 2.5″ anchor fabric 2 – 1″ x 2.5″ background and 2 – 1″ x 2″ background 2 – 2.5″ x 2″ anchor fabric anchorsec2ab1 Sew together all the 2.5 inch wide pieces with the anchor fabric in the middle, and sew the 2″ long background pieces to the top of the 2″ by 2.5″ anchor piece as seen below, making two of each:

anchorsec2ab2

Now take the two pieces that have the anchor print in the middle, and sew a second piece to the left of one and to the right of other as below:

anchorsec2ab3

On the outside of each piece, sew a 3″ x 3.5″ piece of background fabric:

anchorsec2ab4

Now attach a 2.5″ x 7″ piece of background fabric to the bottom of each piece:

anchorsec2ab5

Sections 2a and 2b are complete.  Set aside and work on 2c and 2d.

Sections 2c and 2d
To begin this section you will need 2 – 2″ x 3″ rectangles of anchor fabric and 4 of the 2″ square background pieces.

anchorsec2cd1

Draw a faint pencil line diagonally across each background square.

anchorsec2cd2

Take one of the 2″ x 3″ anchor fabric rectangles and align a square with the drawn line pointing at the upper right hand corner of the rectangle:

anchorsec2cd3

Sew along the line, then trim the bottom right corner with a 1/4″ seam allowance.

anchorsec2cd4

Press open.

anchorsec2cd5

Now take another background square and place it on the rectangle with the drawn line running parallel to the first square, but align this square with the left side of the rectangle.  Once again, sew along this line.

anchorsec2cd6

Trim the top left side.

anchorsec2cd7

Press open.

anchorsec2cd8

These steps now need to be repeated with the second rectangle and remaining two squares, but must be done with the first square lined up with the left side of the rectangle and the drawn line pointing to the top left corner of the rectangle.  Sew, trim and press open.

anchorsec2cd9

Do the same thing with the last rectangle, lining it up with the right side of the triangle and the drawn line running parallel to the first.  Sew, trim and press open.

anchorsec2cd10

Now we need to sew a background piece to the side of each of these diagonal lines.  You will need the last 2 – 2″ square pieces of background fabric and two pieces that are 1″ by 2″.  You can see in the picture below that the diganoal pieces run with the piece on the left pointing left and the piece on the right pointing right.  The 2 inch squares need to be sewn to the inside of these, and the thin 1 inch strip to the outside of these rectangles.

anchorsec2cd11


anchorsec2cd12

The next step is to use two 1.5″ x 3″ strips of background fabric and two 1.5″ x 2.5″ pieces of anchor fabric.

anchorsec2cd13

Sew the 1.5 inch sides together.

anchorsec2cd14

Press open.  Flip one strip upside down and sew both to the top of the diagonal strip blocks we just pieced, with the anchor fabric resting at the top of the diagonal strip.

anchorsec2cd15

And to the outside edge of each piece, sew a 3″ x 2.5″ piece of background fabric.

anchorsec2cd16

To complete these sections, sew each piece to the bottom of sections 2a and 2b as you see in the picture below.

anchorsec2cd17

Finally, add the 1.5″ x 7.5″ strip of anchor fabric down the center of these two pieces.

anchorsec2cd18

Section 2 is now complete!  Time to move to the much simpler and faster section 3.

anchorsec2cd19


Section 3
This section will use the last of your pieces.  Take the 3″ square background square and the 3″ square anchor print square and use them to make two half square triangles.  Make sure to use a scant 1/4 inch seam allowance on this so you end up with 2 – 2.5 inch half square triangles.

anchorsec3b

To form the bottom of the anchor, place a 2.5″ square anchor piece between the two half square triangles as seen below:

anchorsec3c

Sew them together, then add the 1.5″ x 6.5″ strip of background fabric to the bottom.

anchorsec3d

Lastly, add the 4.5″ by 3.5″ rectangles of background fabric to either side.  This completes section 3.

anchorsec3e


Finishing
Lay the three sections out with section one on top, section two in the middle and section three on the bottom.

anchorsec123

A hint:  pin carefully and pay attention to matching your seams well where the anchor fabric needs to line up.  These are the seams that matter most, as the seams in the background fabric are different in each section.

anchorblockdone

Press open and enjoy your anchor!  These blocks measure 14.5 inches square unfinished.  The quilt top I made is 4 blocks wide by 5 blocks long for a total of 20 blocks and measures 56″ x 70″.  I used a turquoise solid from my stash for 19 of them and pieced the 20th square using Essex yarn dyed linen in black.  I pieced a couple of the blocks individually and then cut my fabrics to chain piece the remaining 18 blocks when I was sure I understood the piecing well enough to get it correct.

I hope you make one, and would love to see it!

Jennifer

How to Make a Stick Horse


howtohorse

Last month I made eight stick horses for my son’s birthday party.  A year ago I made the first one, and as I was making them last month I was kicking myself for not keeping a pattern the first time around.

So here it is, my version of How to Make a Stick Horse.

What you need:

To start, you can draw your own horse’s head on a sheet of 11×15 inch paper, or you can just download my pattern.  It’s not fancy, but you won’t have to draw your own.   Print it (no scaling) then take it to a printer to enlarge it 200%.

DOWNLOAD HORSE HEAD PATTERN HERE
stickhorse1 To begin, you need felt.  One half yard of felt will make two horses, but you must buy the felt in half yard increments because 1/4 yard will be too narrow.  You can get 4 horses per yard, so I bought two yards to make eight horses.  In addition, you may want smaller pieces of other colors for the horse’s mane.  The sheets of felt that stores commonly sell will work for this.

In addition, you need some cotton fabric (a fat quarter should do).  Not pictured but needed:  scissors, sewing machine & coordinating thread, pins, hot glue gun and glue, marker, fiber fill to stuff.  And dowels.

stickhorse2

I bought 36 inch long dowels that are 7/16 inch in diameter.

stickhorse3

To begin, cut out pattern and lay on top of a double thickness of felt.

stickhorse4

Trace with a marker.

stickhorse5

Cut along lines.  On the outer edge of the horse’s neck, continue the line on down and cut along that line.

stickhorse6

Cut out pattern.  You should have two ears and two head shapes.

stickhorse7

Fold ears in half along straight edge.

stickhorse8

Flip one head shape over so it’s facing the opposite direction.   Pin an ear on each shape, with the open side of the ear facing the horse’s nose and the fold line facing the neck.  Pin in place near the center of the top of the horse’s head.

stickhorse9

Sew each ear in place.

Note:  If you have big plans for adding ears at this point, do it now.  I opted to leave the eyes off my horses and here’s why:  I’ve learned it’s important to have a starter activity/assignment for children to do while you wait for party guests to arrive, so I chose to begin the party by having each boy choose a horse and draw his own eyes on it.  I wanted the horse to be their own, since we were also asking them to name their horses.  And they LOVED this activity, by the way.  Some of them wanted their horse to have just one eye, others got going and drew spots on ears or around the eyes.  I wasn’t going for a professional, perfect looking horse.  I was trying to provide the basics so their imaginations could run with the idea.  It worked.

stickhorse10

For the mane, take a piece of felt approximately 8 inches wide by 11 inches tall.

stickhorse12

Fold in half lengthwise.

stickhorse13

Fold down the ear on one of the horse head pieces.

stickhorse14

Lay the folded piece of felt (mane) along the outer edge of the horse’s neck with the fold along the edge of the neck.

stickhorse15

Fold down the ear on the other horse head piece and carefully lay down on top of the mane and first head shape.  You should have both ears and the mane tucked inside the sandwich.  Pin the pieces together carefully.

stickhorse16

Sew along the edges of the felt with a 1/4 inch seam.

stickhorse17

Remove pins.  The horse should look like this.

stickhorse18

Carefully turn horse inside out.  Fold the ears back up and fold the mane piece out.

stickhorse19

Cut the mane into fringe strips, being careful to stop before you snip into the seam and the horse head.

stickhorse20

Stuff the head until it’s filled out to your liking.

stickhorse20A

Cut strips of cotton fabric that are 2 inches wide and approximately 18 inches long.

stickhorse21

Carefully insert one end of a wood dowel into the center of the neck, gently pushing it up into the top of the head while leaving some filling so there’s no hard spot on the head.  I used the end that had the barcode sticker on it so I didn’t have to bother removing it.

stickhorse22

Using a glue gun, place hot glue all around the dowel just above the point where the stuffing ends.

stickhorse23

Squeeze the felt around the hot glue and tie a length of fabric in a knot around that spot to secure the horse head on the stick.

And you’re done!  Keep going until you’ve made as many horses as you need for your group.

pickahorse

For my hitching post I used the frame for a standing chalkboard that my son broke a few years ago.  We tied loops of ribbon to the frame that were just a tiny bit loose, then put a stick through each loop to “hitch” them to the rail.  I made a simple bunting that said “hitching post” and the setup was complete.

Twithhorse

Each cowboy picked a horse, addeyes added eyes, horserace and then they were off!

thegroup

We had a happy group of cowboys which added up to a very happy momma as well.

If you’d like more ideas for simple but really fun games to use at a cowboy party, you can read more about ours here .  As for the horses, my younger girls all want one now, so there will definitely be more of them in our future.  I hope you enjoy making yours.

Jennifer

1 2 3 9