
Lone Star Tree Skirt Sew Along: Cut Center and Bind
Welcome back for week five of the Lone Star Tree Skirt Sew Along! Here we are in the last week of the sew along and we’re finishing our tree skirts! Don’t worry if you’re behind or just beginning. It’s a fairly fast project and there is plenty of time to make one before the Christmas rush. Please join us! The tree skirt pattern is available here .
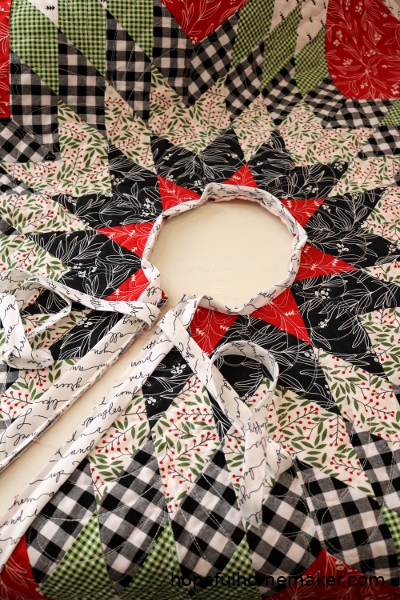
Last week we quilted our lone stars. This week we will cut them to make a tree skirt as well as make a continuous bias binding and ties to finish the project. There are three videos this week. The first demonstrates how to cut your quilt to make a tree skirt.
This second video covers making a continuous bias binding.
Here is the formula I use to figure out fabric requirements for continuous bias binding. Total inches of binding needed x width of binding = square inches of fabric needed. Then divide square inches of fabric by the length of your rectangle, to get the width of fabric you need to make your binding.
First, measure the number of inches around the perimeter of your quilt. For this project, including extra fabric to make your ties, you want 275 inches of binding.
Multiply the total inches of binding needed x the width of your binding. I prefer a 2.25″ binding, so for me that’s 275 x 2.25 = 618.75. The answer is the total number of square inches of fabric you need for the binding. If you like a 2.5″ binding, then 275 x 2.5 = 687.5. Next, take that total and divide it by the length of your fabric (in my case, the width of fabric, which I’m estimating at 38″). 618.75 divided by 38 = 16.28, which I round up to the next whole inch, or 17″. To make a 2.25″ wide continuous bias binding that is at least 275″ long, I need a rectangle of fabric that is 38″ x 17″. For a 2.5″ binding, 687.5 / 2.5 = 18.09, and round up to 19″, or a rectangle 38″ x 19″.
Finally, the third video covers attaching your binding and making the ties for your tree skirt.
My tree skirt has the binding and ties attached and I’m looking forward to a little quiet time to hand stitch it down to the back of the quilt.
That’s it for this week! Have fun finishing your lone star tree skirt. Next week I’ll share my finished tree skirt with the binding finished. Please share your progress with the hashtags #lonestartreeskirt and #hopefulhomemaker because I love seeing them!
Remember that all posts for this project can be found on the Lone Star Tree Skirt Sew Along page.
Have a great week, and happy sewing!
Jennifer
Thank you for this tutorial. I would have been lost without it. I bought the same fabrics as your skirt with the black and white checks.
Where are your videos for this tree skirt? I had question’s regarding your ties and the blog stated it was in one of the three videos, can you send me a link?
Thanks, Mindi
Hi Mindi, the videos are in this post, embedded in the post instead of hosted elsewhere. If you look closely, you will see a small play button in the center of the photos. The photos are the videos. I hope this helps!
Jennifer