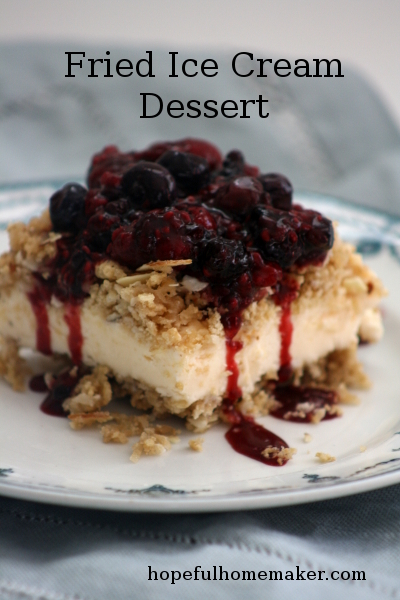
(No-fry) Fried Ice Cream Dessert

My mom started making this dessert when I was a girl, and we still love it.  It has the delicious crunch and taste of fried ice cream, except there’s no frying involved and you can make it in 20 minutes.  This no-fry fried ice cream dessert is one of my favorite go-to recipes when hosting a party or taking dessert to a gathering.  The ingredient list is short and simple, it can be made in advance, and everyone always asks for the recipe.  Today it is my gift to you.


No-fry Fried Ice Cream Dessert

Ingredients:

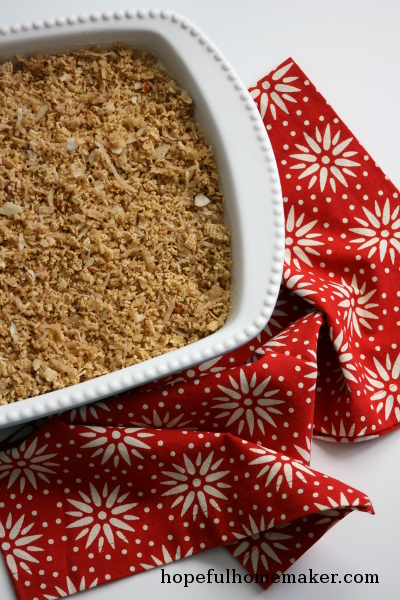
3 1/2 cups crushed Rice Chex cereal

3/4 cup butter

1 1/2 cup brown sugar

1 cup shredded coconut

1 (8 ounce) package slivered or sliced almonds

1/2 gallon vanilla ice cream, softened (the kind in the box works best)

fresh or frozen fruit, or chocolate sauce for topping Directions:

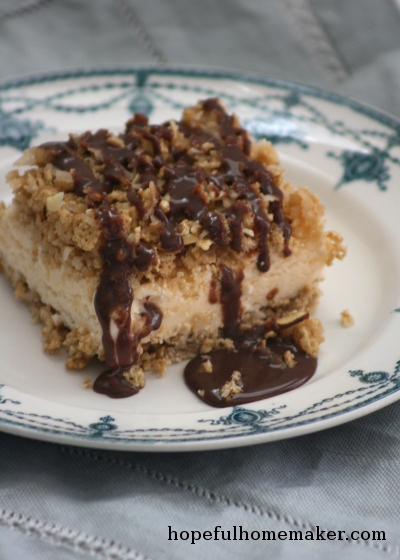
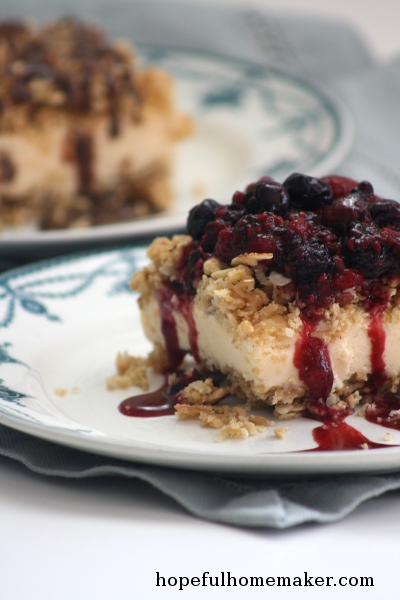
Remove ice cream from freezer to soften.  Crush cereal and set aside.   In a large saucepan, melt butter over medium-low heat.  Add brown sugar and mix well.  Remove from heat and stir in coconut and almonds, then add cereal and mix well to be certain everything is coated with sugar mixture.  Spread half of the cereal mixture into the bottom of a 9×13 pan and press gently.  Open box of ice cream by unwrapping box from around the ice cream.  With a large knife, slice ice cream into slices about 1″ thick and lay across the cereal mixture in pan.  (I usually have to cut the last slice or two into smaller segments to fit.)  Sprinkle remaining cereal mixture over ice cream.  Cover and freeze for at least 3 hours before serving.  Serve with fresh or thawed fruit, hot fudge, or any other topping.  Serves 15-20, depending on serving size.


A few notes:  When preparing this dessert, I usually check in advance with guests to be sure there are no allergies to almonds.  If you need to omit the nuts, simply add a little more coconut to the pan.  In the summer, we eat this with fresh fruit.  In the winter I serve it with hot fudge sauce and berries so my guests can choose their topping.  It looks especially pretty in an Emile Henry pan (my favorite baking dishes, which also make lovely gifts).

Another note:  If you’re in a hurry, you can just make the rice chex and coconut mix, then sprinkle it over a scoop of ice cream in a bowl.  It’s not as pretty, but tastes great!


This no-fry Fried Ice Cream Dessert is always a crowd pleaser.  It’s also a win for the hostess:  it looks beautiful when served, feeds a crowd, can be prepared in advance and in just a few minutes, and has a short and inexpensive ingredient list.  It’s a winner!


I hope you’ll try this dessert for yourself, and I hope it saves you time and stress!  If your family is like mine, you’ll be making it for years to come.

Happy hosting!
Jennifer

Favorite Pie Making Tools


Over the years I’ve made a lot of pies.  I now have a small collection of tools I love to use when I make a pie, and today I’m sharing them with you!  So without further ado, here is the Hopeful Homemaker list of favorite pie making tools!

  1. I’ve had my marble rolling pin for more than 20 years and I wouldn’t use anything else.  I love that it’s heavy, which makes rolling dough easier, and the marble also stays cold, which is just what a pie crust needs.
  2. This marble pastry board is convenient, useful and beautiful.  It keeps pie crust cold, and is portable and easily cleaned on those days when the kitchen counters are covered with preparations for a feast.

  3. Parchment paper
    already cut into large sheets has been my favorite kitchen luxury for many years.  I use it for everything, from lining a baking sheet on the rack beneath my fruit pies (like my Dutch Apple Pie ) to catch spills, to rolling up my pumpkin rolls or baking breads and rolls.  This size is the most convenient and I have a drawer in my kitchen just for parchment paper!

  4. Emile Henry pie dishes
    are my favorite to bake in.  They are made in France and the quality is amazing.  The heat retention is superior, yet they can also go directly from the freezer to the oven without any damage.  The glaze on these dishes is extremely hard, and although I’ve had mine for years and served dozens of pies from it, there is not a scratch to be seen and they still look new!  I gave one to my Mother-in-law several years ago and she has loved hers as well.  To top it off, they’re gorgeous.  I cannot recommend these dishes highly enough.
  5. A good tart pan with removable bottom is helpful for non-traditional pie recipes like my Chocolate Pecan tart .  I use these pans for many recipes and love them.
  6. A sturdy pastry cutter is a must-have!
  7. I love my dough scraper .  It’s really handy for unsticking any section of dough that sticks to my pastry board when I’m ready to transfer it to the pie dish.

Of course, the most important part of any pie is quality ingredients (including good baking flour) and good flavor, but these tools make pie-making easier and more fun.  They are durable (I’ve had all of mine for years) and beautiful.  What tools can you not do without when you’re baking?  Please share in the comments!

Happy baking!
Love, Jennifer

Dutch Apple Pie


dutchapplepie2

One of the best things I did a dozen or so years ago was take a pie-making class.  Not only did I walk away with some good recipes, but I also lost my fear of making pie and ditched the concept that a perfect looking pie equals a perfect tasting pie.  Best of all, I learned how to make this Dutch apple pie, and over the years I’ve made this pie more often than any other.  Some of my children request my Dutch apple pie instead of birthday cake.

The pictures I’m using in this post are representative of what happens when I make it.  I was lucky to get a quick shot of the last slice!

Dutch Apple Pie Recipe
Ingredients:
1 unbaked pie crust 6 medium Granny Smith apples 1 cup sugar 1-1/2 teaspoon cinnamon 3 Tablespoons Tapioca 1-1/2 teaspoon fresh lemon juice for Dutch crumb topping:
5-2/3 Tablespoons cold butter 1/2 cup sugar 3/4 cup flour Prepare the filling:
Fill a large bowl with a few ice cubes and 2-3 inches of cold water.  Add 1 teaspoon of salt to cold water.  This salted ice water will keep your apple slices fresh.  Peel and slice apples, placing apple slices into water.

Roll out pie crust into pie dish.

Note:  my favorite pie dishes are
Emile Henry ceramics .

They are made in France, and are high quality and beautiful.  My pies always bake perfectly in these dishes!  They also make great gifts.


Drain water from bowl.  Add 1 cup sugar, cinnamon, Tapioca and lemon juice.  Mix together gently to avoid breaking apple slices.

Arrange applies in pie shell.

To prepare the Dutch crumb topping:

In mixing bowl, combine flour and 1/2 cup sugar.  Cut cold butter into slices and add to flour mixture.  Combine with pastry cutter or using a hand mixer.  Spoon topping over apples, spreading over entire top of pie to the edges of the pie crust.

Bake:

Line baking sheet with parchment paper and place in oven on rack BELOW the rack your pie will bake on.  This will catch any drips as the fruit cooks.

Bake pie at 425 for 15 minutes.  Turn oven temperature down to 350, cover lightly with foil and bake an additional 45-50 minutes.

Remove pie from oven and allow to sit at least 20 minutes before slicing.  Serve warm or cold with vanilla ice cream or whipped cream.

Enjoy!

During the holidays I serve this pie along with these other favorites:

Chocolate Pecan Tart
Coconut Cream Pie Check out my favorite tools for pie making here .

Happy baking!
Jennifer

1 2 3 4 52