HOME Quilted Christmas Stocking

You may remember the lone 6″ HOME quilt block I sewed in Christmas colors when I also made my 4″ batch of blocks.  I added two rows of Christmas lights to it, and then set it aside so I could make my bunting and ornaments.  All of these blocks are made with my HOME quilt block pattern, which has been my go-to holiday sewing block in 2024.  After finishing those projects, I turned my attention back to the 6″ block.  I decided to make a stocking. After auditioning several prints I ultimately settled on a plaid. Here is my HOME Quilted Christmas stocking.

It’s cheery and bright and it makes me want to decorate for Christmas.

Want a quick how-to for a quilted stocking?

First, find a stocking shape that you’re happy with.  I traced the stockings we use for our family to make a template.  Cut two of them, and if it’s a print, cut them at the same time with wrong sides of the fabric together.  This provides you with a front and a back.  Cut two pieces of batting 1″ larger than the stocking pieces around all sides.

I used adhesive spray to secure the batting to the back of my pieces, and then quilted and trimmed each of them.

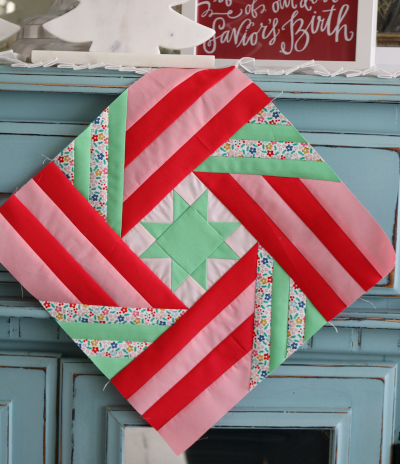
You’ll also need to sew a 6″ HOME quilt block in fabrics of your choice, or choose some other fabric or block to feature.

Because I selected a plaid print for my stocking, I also chose to “applique” the 6″ HOME block to the top of the stocking instead of piecing it together.  I didn’t want to disrupt the plaid by cutting it.  With any other print, I would have pieced the top of the stocking to insert the block before quilting it.  This time, however, I opted to cut and quilt the outer stocking pieces first.  I chose simple straight line quilting that echoed the widest red stripes in the plaid.

I put a piece of batting behind the 6″ HOME block, turned the edges under, and centered it on the top section of the stocking body.  Then I proceeded to stitch it on by machine.

Stitch very slowly to be certain your edges are turned under and the stitches are close to the edge of the block for stability.

Now the front and back of the stocking are ready to go!

Because this is a quilted stocking, you need a lining.   Select a lining fabric, and cut two more stocking pieces, making sure to cut one of each if you’re using a print.  This is easily accomplished by cutting them at the same time, with wrong sides together.

Pair up the four pieces by laying them right sides together.  Make sure that the wrong side is facing out, and that the toes of the stocking are going the right directions.  Next, sew the pieces together along the top edge of the stocking.  On one side, you might want to insert a hanging loop for your stocking.  I used a green ribbon, and put the cut ends into the seam allowance before I sewed them together.  Make sure it’s inside the 1/4″ seam allowance line.  Now open the seams and press.  You should have two very long pieces.

Flip one side so the right sides are together.  Carefully line up the pieces and pin at intervals.  You need to sew these together, but leave an opening for turning the stocking right side out.

Leave an opening about 3″ long on a straight side of the lining.  Stitch all the way around the stocking and stop a few inches early to preserve the opening.

Carefully clip the seam allowance in the toe and on the curves of the stocking.  Cut out tiny “v” shapes and throw them away.  Take care not to clip the seam!  This will allow you to turn the stocking right side out and have a nice smooth curve.

Turn the stocking right side out.  Tuck the raw ends of the opening in, and sew shut.  Tuck the lining inside the quilted stocking.  Ta-da!  You have a lovely, lined, HOME quilted Christmas stocking.  You may want to topstitch around the top edge of the stocking for a nice finish.

To my surprise, I like the slightly puffy dimension of the HOME block on top of the quilting.  In this situation I believe it enhances the stocking, and I’m excited to use my new Christmas themed decorations in my home this holiday season.

Perhaps I’ll manage to finish a few more holiday projects, particularly ones I started last year.  I sure hope so!

HOME Christmas Ornament

After making my HOME Christmas bunting with my fun little Christmas light adorned house blocks, I decided to make an ornament as well.  My daughter and her husband recently moved to a new apartment, and I have a son who was married earlier this year.  It’s their first Christmas together, so a little HOME Christmas ornament felt right.

Technically, I made three.  Obviously one wasn’t enough, right?  I know I’ve said it several times recently, but I am especially enjoying my HOME quilt block this year.  Every time I finish one, I want to make another.

Here’s how I made my HOME Christmas ornament:

I started with the same 4″ blocks, foundation paper pieced, and embellished with Christmas lights.

Once your blocks are sewn, cut a piece of batting and a backing fabric square to match the size of your block.  Mine are all 4.5″ square.

Stack them with the batting on the bottom.  Add the HOUSE block second, facing right side up.  And finally, place the backing square wrong side up, on top.

I stitched them a bit differently than I did the bunting squares.  For the ornament, I started stitching on the top edge, about 1″ in from the right side.   You can see a small “x” in pencil at the points where I started and stopped.  Stitch around the sides and bottom of the block, maintaining a 1/4″ seam allowance.  Finish stitching and back stitch about 1 inch in from the left side on the top.

Carefully trim all four corners, and make certain you don’t clip the seam.  Carefully turn the block right side out.   At this point, it only needs a loop for hanging, tucked into that final open seam.

This is where I did a little bit of experimenting.  For my first block, I cut a piece of ribbon about 8 inches long and turned the raw edges of the block in.  Next I inserted the two raw ends of the ribbon into the seam and pinned it in place.  For this ornament I stitched the closure by hand.

On the second block, I decided to see how it might look if I topstitched the opening closed by machine.  To my surprise AND satisfaction, I liked the way it looked.  The seam at the top didn’t feel distracting to me.

As I finished the first two HOME Christmas ornaments, I wondered how difficult it would be to embroider a small word on the ornament.  Perhaps their names, or the year, or “first Christmas”?  In the end, I settled on “joy.”

I carefully penciled the word on, then clipped my batting square to the block before embroidering.  This prevents the threads on the back of the block from showing through, since I stitched through both the batting and the block.  So cute!

I’m going to have a busy holiday season, and I’m trying now to set my mindset for it all.  I settled on this sentiment:  welcome to the house of joy!

For this last ornament, I settled on a third option to finish it.  This one I did a little quilting on.

Like the second ornament, I stitched the top closed by machine, but kept going and sewed around the outer edge of all the white space.  I wasn’t sure how it would look to sew into the colored corners, and I know there are a lot of layers of fabric there.  This is why I kept to the white.  Next I stitched around the outer edge of the little green house.  You can see the quilting lines on the back:

This last ornament lays more flat than the other two.  I suppose I could have stuffed one like a pincushion to give it more substance, but I didn’t think of it at the time.  (Note to self:  this block could also make a fun pincushion.)  Either way, it was fun to experiment with three slightly different methods of finishing the ornament.

Do you have a preference?  I’m happy with all three.  And there is one more HOME Christmas project still to come:  a stocking.

I have had years where the holidays came and went and I didn’t do a bit of holiday themed sewing.  It made me a little sad.  I am grateful this year to have squeezed it in with plenty of time to enjoy these little projects.  I hope you’re able to do the same!

HOME Christmas Bunting

My mini HOME Christmas blocks didn’t sit for long!  I wanted to do something that would showcase them and especially those cute Christmas lights.  Without further delay, let’s look at this cute HOME Christmas bunting, ready to hang for the holiday.

I used five of my six 4″ HOME quilt blocks to make this bunting, and I alternated the house colors.

It makes me smile, and also makes me excited for the holiday season.

Much like the cute little French knot Christmas lights along the rooflines, I also love another small detail.  I used a light mint green for the double fold bias tape connecting the houses, and wanted a little something extra.  So obviously I cheered a little inside when I found an itty bitty pink rick rack to include.  I stitched it on top of the bias tape after the bunting was put together.  Here’s a good closeup:

Want to make one?  Let’s look at how I made mine.

First I cut backing pieces and batting pieces the same size as each block.  These all measure 4.5″ square.

Place the pieces in this order:  batting on the bottom, HOME block on top of it right side up, then backing on top right side down.  Lay them all exactly on top of one another.

Starting at the top right corner, sew 1/4″ around the side, bottom, and then the left side of the stack.  Leave the top open for turning right side out.  I like to clip the two bottom corners.  Be careful not to clip the seam!

Turn them right side out you’ll have these cute little blocks.  They’re like little pockets.  Arrange them in the order you like, and decide how close together you want them.

I decided to space mine 4″ apart.  If I was making a second bunting, I would probably put them a little closer together.  Slip the open top side of the block into the double fold bias tape, pin or clip them in place, and then stitch down the length of the bunting.

First I sewed the bias tape close to the edge to secure the blocks.  Then I went back and topstitched the mini rick rack in place.

I didn’t sew the ends closed until after I added the rick rack.  Then I tucked the raw ends inside and topstitched it closed.

And that’s it!  My HOME Christmas bunting is complete!

I’m not done with my HOME block yet.  I also made a stocking and an ornament.  And I’m still dreaming of a Christmas quilt made of these darling little 4″ HOME blocks.

1 3 4 5 6 7 518